I do realize that’s a pretty strong statement, given the evolution of pizza from your basic tomato pie with sausage or pepperoni to the amazing creations available at any number of fancy wood and coal-fired joints around town. Pizza is one of those food items that’s tireless in it’s ability to transform itself, often gravitating out to an entire new plain before charging back to it’s humble beginnings once more. What’s old is new again, right? Pizza. Hand held food, and a very personal statement if ever one existed. Everyone has their own ideas about what makes good pizza; what kind of sauce tastes best, what toppings make for the most flavor, the amount of cheese, thin crust or thick, crunchy or soft.
My personal favorite was always sausage, green pepper and black olive. Something about that combination made perfect sense to my mouth. I could handle pepperoni, plain with no additions but given a choice, sausage ruled. The cheese had to be ample, enough to stretch happily out from the crust as I bit in to it, and it always, always needed several shakes of grated parmesan cheese on top. I can still put away a few slices of this perennial favorite, but my tummy wouldn’t be too happy with me. These days, I’m far more content to cover my pizza crust (thin, but not crispy) with a number of vegetables and a much less substantial amount of cheese. I’ve been known to eschew pizza sauce in favor or pesto, or no sauce at all. I’ve rubbed crushed roasted garlic over the crust before placing the toppings on it and I’ve tried lots of variations on the pizza theme, including dessert pizza. I may grow and evolve with my tastes, but I still love pizza. And often I think that I’ve tried most ways possible to eat the ultimate hand-held meal.
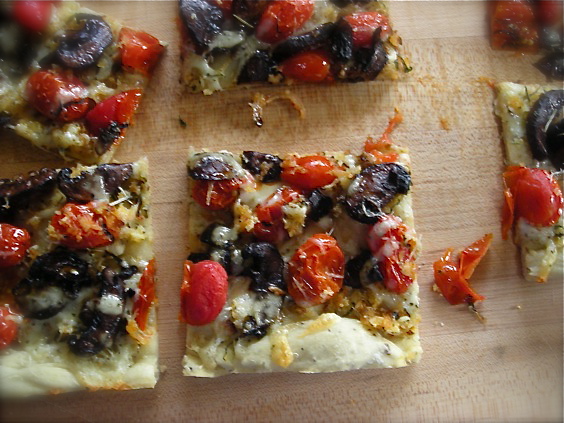
Then I made this pizza:
And wow, did I realize how wrong I was.
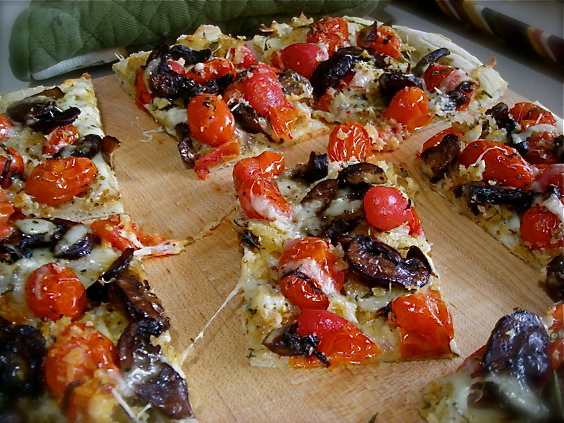
Because all the pizza I’d made involved creating a pie with toppings that baked in the oven. A scatter of diced red peppers, chunks of portabella mushrooms, spinach leaves etc etc…. you place them on the crust and let the oven do it’s work.
This pizza, however, required a bit of foresight. The tomatoes must be roasted ahead of time, and the mushrooms need a nice dousing of good balsamic vinegar and a turn on a superbly hot grill before they can be placed on your pizza crust, covered with a bit of cheese and given a quick dash in to a scorching 500° oven. But the prep is worth it; this pizza has more incredible flavor than what might normally be rendered from placing regular cherry tomatoes and portabella mushrooms on pizza crust.
Recently, I attended a dinner at Levain in Minneapolis, and one of the courses was served with roasted balsamic oyster and shiitake mushrooms. I’m learning to enjoy mushrooms in many forms, having been one of those foods that I simply could not eat for a very long time. But given that I grew up with canned mushrooms in my meals, really, can you blame me? I am a recent convert to balsamic grilled portabella mushrooms at home, loving how flavorful they are, and these mushrooms at Levain delighted me to no end. In fact, many of the other attendees to this dinner stated that these deliciously flavored mushrooms turned them around from their dislike of the fungi and made them happy fanatics. I was in heaven, savoring each tender, savory bite and in the days since, dreamed of those mushrooms gracing my dinner plate.
Then along came this pizza. With tomatoes slowly roasted in the oven until they sizzled and popped. But it needed something else, a rich deep something to balance that tender sweet flavor and these mushrooms, liberally doused in balsamic and olive oil, then cooked lickety-split on a searing hot grill made for a heavenly companion.
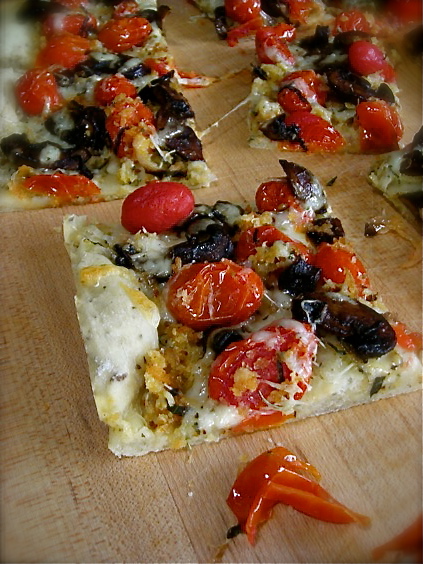
The cherry tomatoes themselves are created with enough flavor to please all on their own; a quick toss with crushed garlic, thinly sliced shallot and a generous handful of panko breadcrumbs, they are then dressed in a bit of olive oil and some fresh thyme and set under the broiler. The heat renders the cherry tomatoes sweeter than you could imagine, with a nice crumb mixture, bits of crunchy shallot and garlic, and here’s where I think the pizza reaches new heights because that browned, seasoned bread crumb on top of your pizza crust makes for a flavor you just can’t get from bread alone.
It all just requires a bit more thought. And every bite is worth it too. Even a few days later as I pulled the last slice from the fridge and ate it cold. It was all worth it.
What’s your absolute favorite way to eat pizza?
Pizza with Charred Cherry Tomato & Balsamic Mushrooms
2 pints cherry tomatoes, washed.
1/2 c. panko bread crumbs
4 cloves garlic, smashed and crushed
2 shallots, thinly sliced
1-2 t. fresh thyme
1 pkg Portabella mushrooms slices
1/4 c. olive oil
2 T. good quality balsamic vinegar
Pizza dough and cheese topping of choice
Preheat your broiler. In a bowl, combine the cherry tomato, panko, garlic, shallot and thyme. Season to taste with salt and pepper and drizzle the mixture with about 2-3 tablespoon of olive oil. Toss gently to coat. Spread mixture on a large cookie sheet and place under the broiler, watching carefully, until the tomatoes begin to sizzle, and brown in spots. It should take maybe 10 minutes or so, being careful not to allow the panko to burn. Remove from the oven and set aside.
Whisk 1/4 c. oil and the balsamic together until emulsified. Pour over the mushrooms in a bowl, and gently toss with a rubber spatula until all the emulsion is absorbed. Do not add more oil or vinegar. The mushrooms can be grilled, or they can also be broiled until they are richly browned and tender.
Heat your oven to 500° and if you have a pizza stone, heat it in the oven for up to 30 minutes. Roll out your pizza dough to desired size and thickness on parchment paper. Scoop some of the cherry tomato mixture on to the crust, then scatter the mushrooms. Add your cheese and place parchment on heated pizza stone. Bake the pizza until crust is golden and topping sizzle. It shouldn’t take long at all.
Original recipe from Food & Wine, with heavy modifications.
Kate says: I used a pizza dough recipe from Cooks Illustrated. Wish I could give it to you but they don’t like it when bloggers share their recipes, the meanies. Any scratch pizza dough you like will work.
