March 25th, 2014
| 1 Comment »
Did you know that the Chocolate Lava Cake was an accident? In a rush to provide a warm dessert, the chef who created it took the cake out of the oven too soon, and when a fork was pressed in to it, the soft, melty interior slipped out. The chef was aghast, but the customer loved it. Boom. Herald the ubiquitous appearance of it on restaurant menus for decades, and a spot in the Dessert Hall of Fame.
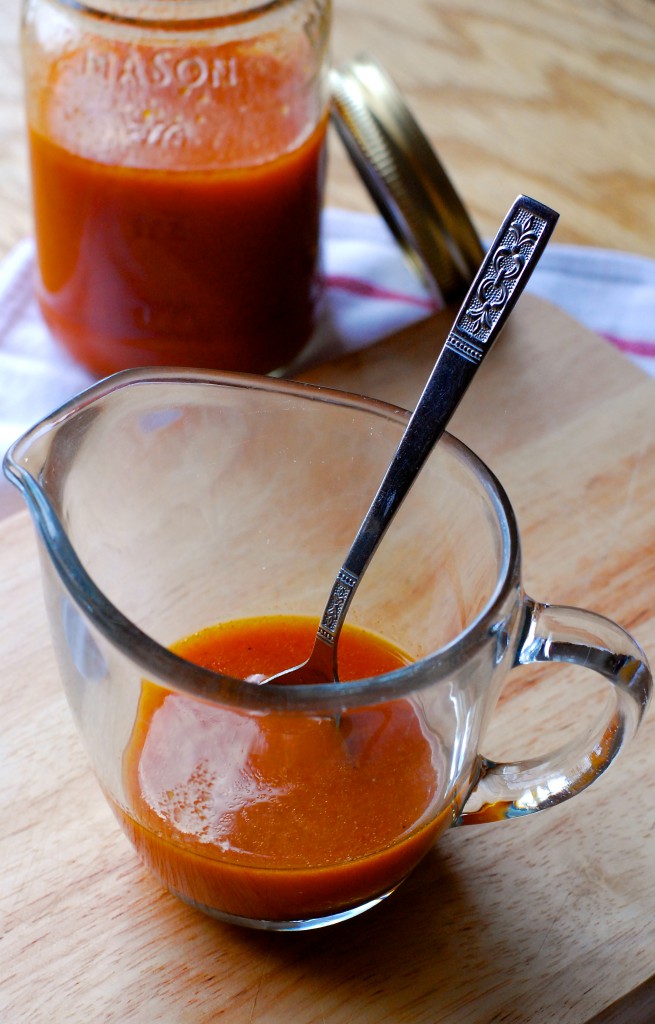
This Smoky Blood Orange vinaigrette was also an accident. A delicious and colorful accident.
Back at the beginning of the month I had a dinner party to celebrate my 50th birthday, and invited some of my closest friends. It was a wine-soaked feast full of amazing food and so much laughter. My friend Mellissa brought a Greek salad with a stunning Blood Orange vinaigrette and I kind of glommed on to that vinaigrette and wanted to pour it over everything I ate. I even bought a container of Aliseo Blood Orange juice so I could whip some up for every salad I ate. During one of these moments, I grabbed a container of smoked spanish paprika off the shelf and shook a little in to the measuring cup.
Then I had that moment much like Chocolate Lave Cake Chef, where I was aghast, and thought ‘Oh dear…. that can’t possibly work, can it?’ I mean, I’ve been putting smoked paprika in a lot of foods because it tastes just so darn good and it was more like habit to reach for the dark red bottle on the spice shelf. Shrugging off concern, I whisked it, tasted, adjusted and tasted again. Then I poured it over a pile of lacinato kale and a bevy of other beautiful vegetables.
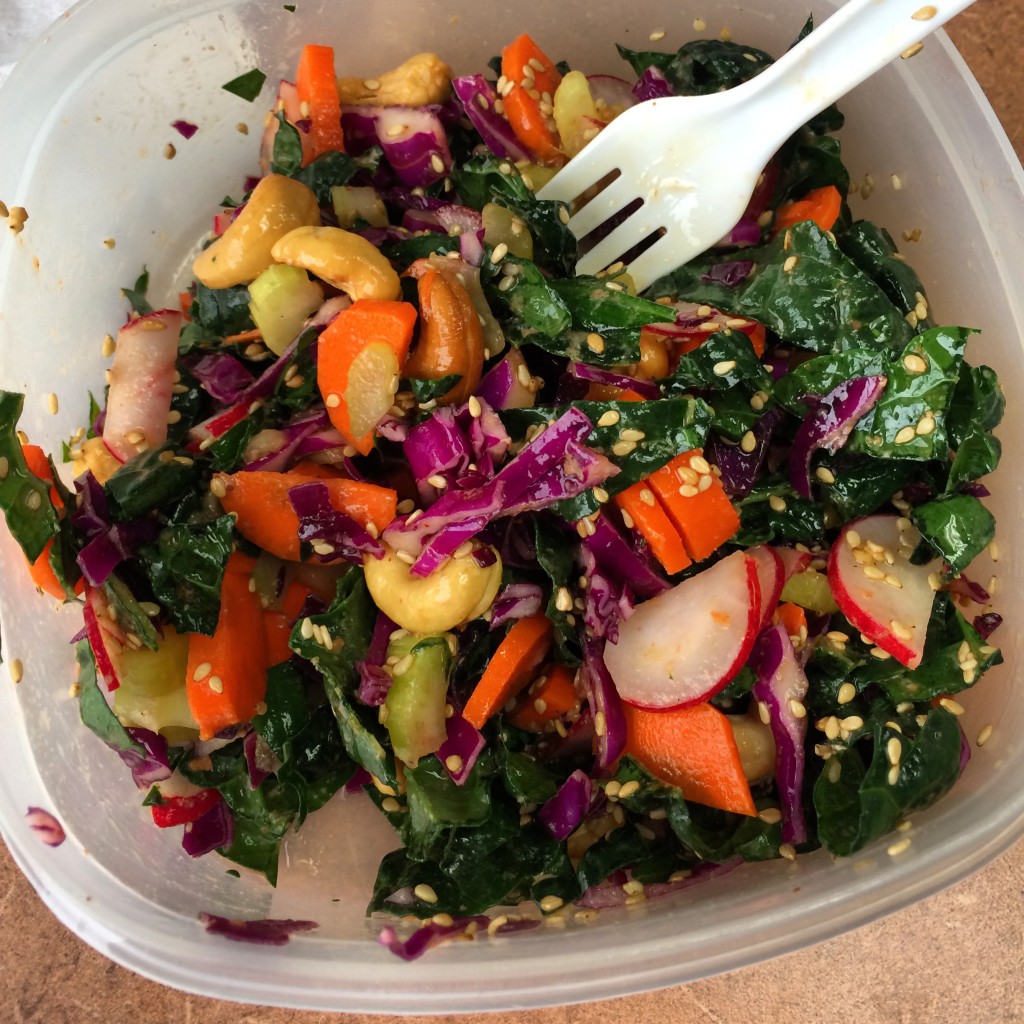
The first bite was a revelation. And another happy accident became an amazing delight. There was the tart citrus, the smoky paprika and a hint of sweetness from coconut palm sugar. I use brown mustard, minced shallot and some garlic, salt and pepper. It’s really nothing to make a vinaigrette from scratch, and the taste of your homemade salad dressings is far and away better {and better for you} than anything you can get in a bottle on the grocer’s shelf.
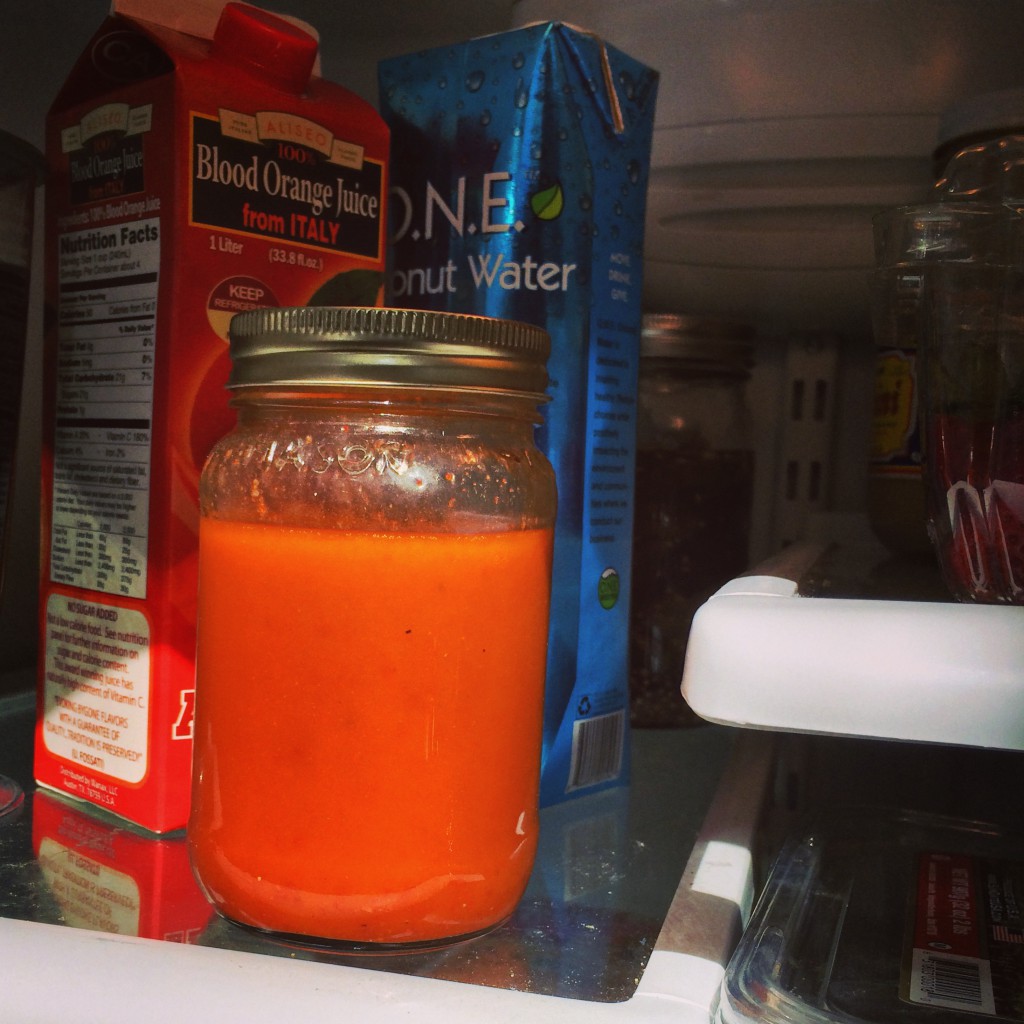
And besides…. it looks so pretty inside your refrigerator.
Smoky Blood Orange Vinaigrette
1/2 c. top quality olive oil
1/3 c. blood orange juice
1 T. whole grain mustard
1 small shallot, very finely minced
2 cloves garlic, very finely minced
1 t. coconut palm sugar (or sub in any sweetener of preference)
1/2 t. cracked black pepper
1 t. fine grain sea salt
1 T. smoked spanish paprika
In a 1-pint glass jar (or other vessel of equal size), measure all ingredients. Shake or whisk well until fully emulsified. Taste and adjust seasonings to your liking- more sweet, more salty, a bit more juice….. I’ve found this vinaigrette needs more juice than the standard 2-1 ratio of a basic vinaigrette, but I want to taste the bold flavor of the blood orange juice. You may like it with less pizzazz. I recommend chilling it thoroughly before using, and tasting it again to see if it needs any more flavor adjustments.
September 19th, 2013
| 3 Comments »
I have been fortunate lately to receive some really nice books for review purposes. This particular one, ‘Heirloom Flavor: Yesterday’s Best Tasting Vegetables, Fruits & Herbs for Today’s Cook’ by Doreen Howard, was highly anticipated, as our CSA offers many heirloom varieties, an option that was a huge draw for me in selecting it in the first place.

Come in to my kitchen…
July 30th, 2013
| 2 Comments »
Canning and preservation of food can happen year round, but it’s during the summer when people consider putting up the excess of the season the most. My Instagram feed is jammed with photos of …. well, jam. And pickles! Oh, the pickles. They are everywhere, veggies of every sort soaked in vinegar and spices and the giddy anticipation is felt right through the computer. It seems that the waiting time for proper pickles of any kind is now akin to the last few days before Christmas in it’s anticipation.
Growing up, my Mom did not do any preservation. During the Summer she spent plenty of time and cash purchasing cases of peaches and cherries, and maybe a pie or two was made from the bounty, but she loved fresh fruit, and we loved fresh peaches and cherries and most of that case would end up in our mouths, fruit juice staining our shirts or running down our elbows; I have the quintessence Summer memory of sitting on the back steps with a peach in hand, pressing my teeth over and over in to it’s superb flesh, and getting soaked in sticky-sweet juice like every child should at some point or another. The smell of ripe peaches catapults me backwards to sultry Summer, and the eager anticipation of that overflowing box of fruit, colanders filled in the sink while a Summer breeze shifts the window curtains, and more sweet, intense peaches, or cherries, to eat than should be legal. I love the idea of canning fruit, but there isn’t even comparison to flavor of fresh, no matter how diligent you are in the process, and that slip of difference always keeps me in check when I think of fresh peaches any other time of year. If the burning sun isn’t drying peach juice on your hands, it just isn’t the same.
My sister-in-law is the jam-maker in the family. She loves it, and makes quite a lot that she happily shares. I love a good, homemade jam, and I’ve tried making it a few times. Once, it was perfectly jam-like and I didn’t mind the process at all. We coveted the result, too; opening a fresh jar of deep and dark jam that smelled like summertime was such a treat in the dead of Winter. The next time I ventured to make it, it felt like the process was mocking me. It didn’t feel right, nor did it go right, and the final result was more like a thick syrup than anything close to resembling jam. We ate it anyway. Are you kidding? Blueberry syrup is divine. From that moment on, I just made syrup. Forget the jam. Me and pectin apparently don’t know how to figure each other out.

This raw Chia jam isn’t even like jam at all, except a bit in it’s consistency. If you’ve ever made a pudding with Chia seeds, then you can kind of get how this jam works- the mighty little Chia seed, worthy of soaking in up to 10 times it’s weight in liquid, is the binder, no pectin needed. Fresh fruit is whirred in the food processor with Chia seeds, the scrapings of a vanilla bean and a good dose of crossed fingers, then in a jar it goes for an overnight stay in the refrigerator. The next day, spread on toast, it’s fruity, with the tiny, almost imperceptible gel-like quality of Chia and the unearthly beautiful scent and flavor of fresh vanilla. I buried the vanilla bean pod in the jam for it’s overnight, to infuse more of the flavor because a vanilla bean buried in anything with fruit is magical in every way. What the jam isn’t is overly sweet. There is no added sugar, which you need a ton of in homemade jam. In this version, you taste fruit, subtle and sweet all on it’s own, but if you like the cloying sweet taste of jam with it’s sharp undercurrent of pectin to hold it’s shape, this jam might not be for you. But I encourage you to try one jar, as it’s just the simplest of simple things to make, and keep your mind open to possibility. It may ‘Wow’ you in an unexpected way.

My original inspiration came from Shockingly Delicious, who’s photos of her Raw Strawberry Chia Jam made my eyes bug out. I switched out the vanilla syrup that her recipe calls for to use the vanilla bean, and instead of lemon juice, I added fresh squeezed lime juice and a bit of zest, which you just don’t taste at all as much as it adds a dash of brightness to the final end result.
And it should suffice to say that any fresh fruit would make for a fine substitute for the Blueberries. Get crazy with it.
Raw Blueberry-Vanilla Chia Jam
1 c. fresh blueberries, washed
1 tsp. fresh grated lime zest (lemon is fine, too)
1 Tbsp fresh squeezed lime juice
1 Tbsp. chia seeds
Seeds scraped from one vanilla bean
Place all ingredients in a food processor or blender and blend until smooth and consistent. Alternately, you can place all the ingredients in a bowl and mash with either a fork or a potato masher for a thicker, chunkier consistency. Scrape in to a jar with a tight fitting lid. Press vanilla bean pod down in to jam, seal lid and place in refrigerator overnight. Stir jam before using. Vanilla bean pod can be discarded or left in jam to heighten the flavor.
August 1st, 2012
| 4 Comments »
It isn’t much, I admit. This spread, or dip or whatever you wish to call it was a lightning bolt of inspiration one night when I was craving something different to put on our favorite grilled dinner item- a loaf of pillowy ciabatta bread stuffed with an assortment of grilled vegetables.

Sweet corn is in that stage of ripeness and availability right now that finds it everywhere you turn, and we’re consuming it several times a week, as well it should be. We’re so blessed in Minnesota to have an abundant crop of the good stuff, ready on road side stands, in the Farmers Market and a few select amazing Minnesota grown varieties in the local grocers as well. Sweet corn that bursts when you bite it, needing little besides a drizzle of butter and salt to make it wonderful. Have you tried mashed avocado on sweet corn? You must. It’s simply divine. And this creamy, slightly tart-sweet spread also lends itself highly to corn, hot from the grill or bubbling stock pot of water.
Beyond the goat cheese and sweet corn kernels, stripped from the cob, you could do any additions to this, with endless possibility. Fresh herbs are a must; I used lemon thyme, oregano and parsley (my basil is overgrown and bitter from the heat- big sad eyes here) but if you have good basil, by all means, use it in this spread. Add a pinch of sugar to balance the tart; combine some Southwestern flavors like cumin, lime juice and zest and chili powder for a big ol’ kick. Add curry powder and lime juice for an altogether different interpretation. Since the sweet corn supply is endless, your variations on this could be as well.
Sweet Corn & Goat Cheese Spread with Fresh Herbs
1 ear sweet corn, cooked and kernels stripped
2 oz soft plain goat cheese
1 T. fresh squeezed lemon juice
1 t. fresh lemon zest
3 T. mixed fresh herbs
Pinch of brown sugar
Salt and pepper to taste
Place all ingredients in the work bowl of a food processor and process until fully combined, scraping bowl occasionally. Taste for seasoning, and add more salt and pepper if it’s too sweet, or a bit more sugar if too tart.
Just a note on this: I have a tiny little food processor, like a quart sized one and it was perfect for making this spread. In a larger bowl type of processor, you may not have a confined enough space to get it to mix properly. Try it in a regular blender, or in a deep pyrex measuring cup with an immersion blender if you have either of those options. This made about a cup’s worth of spread, but if you want to make more, increase the ingredients accordingly.
July 16th, 2012
| 5 Comments »
I’ve never really been a fan of ketchup, and can’t recall the last time I really ate it. Maybe in college, dragging a thick and steaming hot onion ring through a plate of ketchup and mustard swirled together, or possibly on a bratwurst, back in some far away and hazy memory but it’s been a really long time. Griffin likes it, Mike won’t touch it.
Then I discovered tomato jam.

From Herbivoracious, my current cookbook love by Michael Natkin, I saw this condiment in the last pages of the book and was intrigued by it, then read a really positive and glowing review of the same recipe on another food blog, sealing the deal. With a few imperfect tomatoes and a bit of time to simmer the jam, the first time I scooped it on to my plate and tried it was a revelation. I frankly didn’t know what to expect, but what landed on my tongue was unlike anything I’d tasted before. It was thick and bursting with tomato flavor, a bit sweet but not at all syrupy or tinny like ketchup. And as soon as the last bit was scraped from the jar, I knew I needed to have more.
And the thing is, this is a perfect recipe for this time of year. You don’t need lovely tomatoes to make it because you cook them down to a thick jam, so all those ones on the vine that don’t make it to the plate, the ones that maybe split in the heat, or have one side that won’t ripen; think of the bushels of tomatoes at the Farmers Markets that are there for canning too, how perfect they’d be to make this extraordinary condiment. It goes so well on burgers, sausages, hot dogs, veggie patties, on top of grilled vegetables or spread on bread for your sandwich. You might think you need to hide it in the fridge so your spouse won’t eat the last of it. (ahem…. not that I did that or anything…. just sayin’) It’s a quintessential summer treat, making your cook-out more refined and grown up. Save the syrupy sweet ketchup for the kids in your life. This tomato jam?? It’s ketchup with a Ph.D. And that’s for us.
Tomato Jam
1-1/2 lbs of fresh tomatoes, peeled
1/2 a small onion, diced
3/4 c. sugar
2 T. lemon juice
1 T. kosher salt
2 T. chopped fresh rosemary
Pinch of saffron threads
Pinch of crushed red pepper
Fresh ground black pepper
In a medium saucepan, combine all the ingredients except the black pepper. Bring to a boil, reduce the heat and allow to simmer until the jam has thickened, about an hour or more. Stir often while it simmers.
From Herbivoracious.
KATE’S RECIPE NOTES:
This cooks for a looooooonnnggg time. A very long time. The first batch I made took well over an hour to cook down, and the second round I made was a double recipe and that one cooked for over two hours. Most of that time is pretty hands off though; you stir every once in a while but you are not tied to the stove by any means.
I’m not a huge fan of rosemary. WHAT?? I know. But I’m not. So I subbed in lemon thyme, oregano and parsley and who would even know that this wasn’t exactly how it should be made?? It’s glorious this way. Experiment with your own fanciful herb combinations. For both batches I reduced the sugar, adding only 1/3 of a cup for a single batch, 1/2 cup for the double batch. I also added lemon zest to the mix because when you’ve got lemon juice, you need lemon zest, as far as I’m concerned. But that’s just me. The book says to use up the jam in three days, and although I’m certain I could have done that if I tried, it lasted for more than a week in my fridge just fine.
I’m debating an attempt to water bath process some of this so I can have it all winter long. It’s probably going to happen. Probably.
January 31st, 2012
| 4 Comments »
Previously in this space, we talked about mushrooms. Specifically, we talked about my quick and decisive learning curve that led me to an all-out lustrous affair with fungus.
Today, it’s all about Beets.

Beets and I had a torrid love affair back in 2009; it was then that I discovered the merits of this earthy root vegetable, one that turns tender and appealing from a long stretch in a hot oven; that it’s earthiness and deep, dark flavor isn’t so overpowering when paired with any number of other ingredients, and most specifically, that the nutrients in this little orb are well worth an incorporation to one’s regular eating. The greens also made their way in to my heart, one of the first to do so, and I believe they were responsible for me learning to love all things dark green and leafy.
Beets have a spectacular nutrient profile, primarily being a superb source of anti-oxidants, with anti-inflammatory and detoxification properties as well. Beets are in the same Chenopod family as spinach, chard and, surprisingly, quinoa. And while they contain an incredible amount of anti-oxidants, it’s the specific ones in beets- lutein and zeaxanthin- that make these vegetables stand out with their nutritional defense for your well-being. Lutein is especially beneficial for eye health, and the anti-oxidant mix in Beets is highly supportive of the nervous system. The anti-inflammatory properties of Beets also support heart health, and can help balance inflammation brought on by Type-2 Diabetes.
But even with all that, many people can’t get past the taste of Beets. They are dark and earthy, and quite honestly, I struggled with them at first, but I discovered that the lovely gold Beets are far less heavy tasting than their red cousins. Once I was able to enjoy the gold, I tried several recipes with the red and found a lot to enjoy about them as well.
Then, along came this recipe, pairing mellow and tender roasted beets with garlic studded mashed potato in a classic Skordalia. One bite and I was in love. With Beets. Again. Oh the glory…..

Served warm, with toasted pita bread on the side, this simple, non-fussy dish was rich with flavor and texture. The soft, fragrant potato mix, studded with garlic and thickened with a swirl of a soft, fruited olive oil lends a beautiful contrast to the hearty and tender roasted beets. I would have never imagined that the two of these foods together, both so simple and humble, would be so perfect.
Roasted Beets with Skordalia
4 medium red beets (about 1 1/2 lbs.) trimmed and cleaned
10 tbsp. extra-virgin olive oil
Kosher salt and freshly ground black pepper, to taste
1⁄4 cup finely ground toasted walnuts
1 tbsp. red wine vinegar
6 cloves garlic, smashed and minced into a paste (I sauteed the garlic in some of the olive oil before adding it to the potato for a more mellow garlic flavor)
2 medium russet potatoes,
peeled and cut into 1″ squares and boiled until tender
Heat oven to 425°. Put beets in an 8″ x 8″ baking dish and drizzle with 2 tbsp. oil. Season with salt and pepper and pour in 1 cup water. Cover pan tightly with foil and crimp edges to form a seal. Bake beets until a knife inserted into beet slides easily into the center, about 1 hour. Transfer pan to a rack, carefully uncover, and let cool for 30 minutes. Peel beets and cut into 1″–2″ pieces; set aside.
Put walnuts, vinegar, garlic, and potatoes into a medium bowl and mash potatoes until smooth. Vigorously stir in remaining oil and season with salt and pepper. Transfer beets to plates and serve with some of the skordalia spread on the side.
Recipe posted in it’s entirety from the original source in Saveur magazine, issue #131.
June 19th, 2011
| 6 Comments »
I made mustard as a Christmas present last year.

Mustard is one of my most favorite condiments, and it surprises no one more than me because I used to just hate it with a passion. Then as I got older, I managed to learn the delicious aspect of yellow mustard swirled with ketchup to drag your onion rings or french fries through, and I somehow realized that a swipe of yellow mustard and a few spoonfuls of sweet pickle relish were the ONLY way to eat a hot dog. Well, back in the day when I actually did eat hot dogs……
But then something happened. I discovered the delights of mustard, in it’s many forms. There was dijon, there was stone ground, and then we discovered jalapeno mustard. Along came honey mustard, and how wonderful it is warmed up as a dip for thick chunks of Snyders pretzels. There’s brown deli style mustard, chipotle mustard, raspberry mustard and Koop’s Arizona Heat. And where there once was only a small array of mustards on the grocers shelf, there now lies a vast display of mustard in so many flavors that it’s mind boggling to this mustard fiend. At one point, I think we had something like 6 or 7 different mustards in our refrigerator. We like our mustard.
And it’s really super easy to make too, that is, if you have a source for mustard seeds. Our local co-op carries both brown and yellow seeds, and once that was discovered, I had no reason not to whip up a mighty batch of this Roasted Garlic mustard to hand out as Christmas gifts last year. A mighty batch indeed; this made A TON of mustard. I gave away quite a bit, and kept three jars for us.
Now, our last jar stands open in the fridge.

It’s vinegar-y. It’s spicy. It rocks my sandwiches with flavor, it’s tiny little seeds popping in my mouth. It’s killer good on a bratwurst, or spread on ham or salami. I’d happily down a thick sandwich chock full of meat just to swab my bread with this killer condiment. I sent a jar off to the East Coast too, to my blogging friend Kim, also known as The Yummy Mummy and the Queen of #Charcutepalooza, a blogging phenomena that swept through Twitter, urging bloggers to cook their way through Michael Ruhlman’s Charcuterie cookbook. It sparked a revolution and it’s been amazing to watch it unfold. I knew the mustard would come in handy for all that cured porky goodness and I was right. Kim has asked me probably six times to post the recipe and finally, with her last prompt, I gave in. She can be kind of a pain in the ass kind of persistent, that girl.
My last jar……. I should hoard it. If I give in and make another huge batch, I’d have to find homes for all that mustard again. But I think it likely won’t be that hard.
Roasted Garlic Mustard
2-1/4 c. whole yellow mustard seed
3/4 c. whole brown mustard seed
2-1/2 c. apple cider vinegar
1-1/2 c. water
2 whole heads garlic
2 T. olive oil
1/2 c. pure maple syrup
2 T. kosher salt
Combine both mustard seeds, vinegar and water in a large bowl and stir to combine. Cover and let stand at room temperature for a minimum of 8 hours, but I strongly recommend a full 24 hour soak for best flavor. Stir occasionally to mix it all up.
Slice the tops off of the garlic heads and remove most of the papery outer layer, leaving the cloves intact. Line an 8″ pie plate with foil and place garlic on foil, drizzle with the olive oil and fold the foil around the heads. Roast at 400° until very soft, 40-60 minutes. Allow to cool and gently squeeze the cloves from the skin. Place in a bowl and mash slightly.
Add half the mustard seed mixture to the bowl of a food processor. Scrape in half the mashed garlic and process in pulses, adding water by the tablespoon, until it begins to break down and look like grainy mustard. Process to whatever texture you wish, adding water and scraping the bowl as needed. Scrape processed mustard into a large bowl and repeat with remaining seed and roasted garlic, and add to processed mustard. Whisk in maple syrup and salt.
Spoon mustard into clean jars and seal lids tightly. Store in refrigerator. Makes about 8-10 cups.
Recipe from Eating Well magazine
Do you like mustard? What kinds do you like and how do you like to eat it?
|


