March 15th, 2009
| 3 Comments »
Seemingly a whole lifetime ago, I worked for five years in the office of a wholesale bakery and I have to say, the smell of yeast has been and still is one of my most favorite smells of all. I loved walking through the production area in the early afternoons as the baking staff began their daily preparations; I loved standing by the enormous mixing bowls as hundreds of pounds of bread dough, pungent with the scent of yeast and flour, spun and smacked around inside. It was a happy day indeed when my boss would inform me that they would be making test batches that day because I knew he would be bringing me endless samples of warm bread to critique. And the best perk was free bread for the taking- crispy baguettes that snapped when you broke them, showering golden shards of crust everywhere, tangy sourdoughs, pillowy stirato loaves, rustic wheat breads and a mouth-watering marble rye that was my favorite sandwich loaf. The best lunch I could indulge myself in was a sliced baguette spread with a little of their scratch aioli and a few slices of salty ham. I was in carb heaven. I still miss the amazing bread, and it’s been a very long time since I last walked through those doors. I can buy the loaves in the grocers, and the flavor is still good, but I miss the experience of picking up a loaf off the rack that was only hours out of the oven, ethereal in it’s taste.
 I still love really good bread and for a long time I routinely spun loads of flour, water and yeast in my bread machine, so much so that I managed to effectively kill the thing outright, but I’m happy to have gotten my money’s worth. Since then, which was quite a while ago, I haven’t made a lot of bread from scratch despite having the time and the desire for it. I experimented with this amazing no-knead bread and loved the rich dense crumb and tangy flavor, but I am plagued with a ‘Must Have It Now’ mentality sometimes, and this just doesn’t work well with the patience and time required for a good loaf of scratch bread. There are some high quality artisan bakeries in the Twin Cities, including my old employ, and for a short trip in the car I can pick up a few loaves of bread to indulge myself in, but what I really need to do instead is lose the impatience inside of me and buckle down to make myself a good loaf on a regular basis. I still love really good bread and for a long time I routinely spun loads of flour, water and yeast in my bread machine, so much so that I managed to effectively kill the thing outright, but I’m happy to have gotten my money’s worth. Since then, which was quite a while ago, I haven’t made a lot of bread from scratch despite having the time and the desire for it. I experimented with this amazing no-knead bread and loved the rich dense crumb and tangy flavor, but I am plagued with a ‘Must Have It Now’ mentality sometimes, and this just doesn’t work well with the patience and time required for a good loaf of scratch bread. There are some high quality artisan bakeries in the Twin Cities, including my old employ, and for a short trip in the car I can pick up a few loaves of bread to indulge myself in, but what I really need to do instead is lose the impatience inside of me and buckle down to make myself a good loaf on a regular basis.
On a recent trip through the library, I came across the publication of a local group called The Saint Paul Bread Club. I barely hesitated before slipping the slim book off the shelf. It’s basic and fundamental, nothing glossy or fancy, just page after page of bread recipes from a local group of passionate bread bakers, along with plenty of insider tips and hints to making better breads at home. After a few perusals and some thought to the first loaf to try, I rolled out of bed on a particularly gloomy morning after a simply pathetic night’s sleep and all I could think about was the smell of yeast, a warm glowing oven and the taste of a fresh warm loaf. The weather promised everything from rain to an eventual accumulation of upwards of 6″ of snow. It instilled in me both a bluesy melancholy, and a fierce need for the routine of baking, the rhythmic kneading and the promise of carbohydrates.

This loaf contained bulgur and millet and I had both on hand. Bulgur is cracked and parboiled wheat and really simple to use- it requires little else but a soak in hot water. Millet is a hulled, wheat-free cereal grain- the outer husk is removed leaving tiny yellow balls. Millet requires cooking, but this recipe didn’t make any mention of pre-cooking the grain so I didn’t, and it plagued me on whether or not this would result in a tooth-cracking slice. It didn’t.

This recipe started with a sponge- honey, warm water and yeast were whisked together until foamy, then stirred with whole wheat flour, bulgur, oil and salt and allowed to sit until all puffy and fragrant. I mixed in the bread flour and millet, and pretty soon was faced with a coarse hairy blob of dough, and tiny grains of millet popping all over the kitchen. It seemed like hours before I stopped feeling their little hard knobs under my feet, even with obsessive sweeping. But the magic of kneading kicks in- and magic it is- taking a rough and craggy blob and transforming it into something smooth, elastic and uniform, dotted with the tiny yellow points of millet and smelling alive and warm.
  
The rest is your basic bread instructions; rise until doubled, punch down and allow another rise (which I skipped for time purposes) shape the loaves and place in a pan, rise to double again and then bake. I won’t bore you with instructions.
And somewhere along the way, amidst all this tactile interaction and flour/yeast transformation, a tiny sliver of light knifed through me, lifting the melancholy, driving it far away. Was it the nap I took during the first rise? Maybe. It likely was something else altogether; the bread making lifted my spirits, even with the late winter storm blowing hard outside and the yeast saturated me with it’s own little charm. It could have been the workout I gave my arms and shoulders as I kneaded, driving a much appreciated blast of endorphins into me, or it could have been the fact that a hands-on loaf of bread is a thing of beauty. It transports you back to a simpler time, before cellophane loaves were the norm, where you watch a few pantry staples work a magic trick right before your very eyes. It’s nearly impossible to bury yourself in the blues with that happening in front of you.
And the taste….well, that’s enough right there to lift your spirits. This loaf was moist, a nice dense crust and crunchy little bites of millet throughout. It made awesome toast too- to me, the best indicator of a good bread. I’m thinking that I need to buy this little bread book.
(recipe after the jump)
Come in to my kitchen…
December 22nd, 2008
| 5 Comments »
And you thought I was done talking about food holidays!!

December is National Fruitcake and National Eggnog Month. Blech. Just the word ‘fruitcake’ conjures up images of crazy people, and the real deal is not at all appetizing although I would like to taste one, for real, that is fresh and worthy of praise instead of ridicule. The poor Fruitcake just never gets any respect- the lil’ Rodney Dangerfield of food.
Today is National Date Nut Bread Day. I’m a big fan of dates and have been since childhood. My mom made the standard Date Bars- you know, with the oat topping?- and I loved them dearly. Sadly, her recipe isn’t in my treasured recipe box of hers, and despite several attempts with recipes found on-line, I haven’t been able to duplicate her offering and gave up, full of sad face and regret, resigned to a date-less existence.
But the holiday intrigued me because this is bread, and it has dates and it shouldn’t be too hard to come up with an option that doesn’t make my teeth hurt from being too sweet. Dates are notoriously sweet and contain the highest concentration of sugar in any dried fruit. They are also higly caloric, but they are loaded with potassium and fiber and can be an enjoyable treat, in moderation. One thing they don’t need at all is any extra sugar, so in finding a recipe that relied on only the dates for sweetness was a bonus in my mind.

I’m not one to expend too much effort searching online recipe databases for the perfect recipe. I’m not patient enough for that. If I’m looking through Recipezaar, AllRecipes, Epicurious or any other site, I want to find something quickly and not spend endless time perusing through countless offerings, reading dozens of reviews and gazing at pictures. I trust reviews the most and they need to be unanimously positive. Coming across this bread recipe on the AllRecipes site, the first thing I noticed was that it had no added sugar, the next thing I read were the enthusiastic reviews that claimed this moist tender bread would surely be a hit. I didn’t need any more than that.
The best part was, they were right. Even slightly overcooked- which seems to be a recurring theme in my kitchen lately- the bread held a nice moist feel and was chock full of date flavor without making my eyes water from the sweetness. Without the sugar, the true flavor of the fruit shone through, and really, isn’t that why we eat something in the first place? This will be a repeat in my kitchen, with proper oven timing, whether it’s a food holiday or not.
Moist Date Nut Bread
from AllRecipes
- 2 1/2 cups chopped dates
- 1/4 cup butter
- 1 1/2 cups boiling water
- 1/2 cup packed brown sugar
- 1 egg
- 1 1/2 cups all-purpose flour
- 1 teaspoon baking soda
- 1 teaspoon baking powder
- 1 teaspoon salt
- 1 cup chopped walnuts
- Preheat the oven to 350 degrees F (175 degrees F). Grease and flour a 9×5 inch loaf pan.
- In a medium bowl, combine the dates and butter. Pour boiling water over them, and let stand until cool.
- When the dates have cooled, stir the mixture to break up any clumps. Mix in the brown sugar and egg until well blended. Combine the flour, baking soda, baking powder, and salt; stir into the date mixture until just blended. Pour into the prepared pan.
- Bake for 50 minutes in the preheated oven, or until a wooden pick inserted into the center comes out clean.
KATE’S NOTES:
I followed this to the letter except for the walnuts. I don’t do walnuts, not after a childhood of dealing with walnuts in every home baked goodie I ate. I loved my mother’s baking, just not her love for walnuts. Instead, I finely chopped almonds and sprinkled them over the top of the loaf before baking. I think pecans would be nice too.
Be sure to thoroughly allow the dates and butter to cool and absorb the liquid. It will become a thick fragrant paste and really, is quite delicious all on it’s own but keep your spoon out of it and use it in the bread! A little fresh grated nutmeg would probably add a nice flavor touch to this, but the date flavor all on it’s own is really delicious.
December 8th, 2007
| 13 Comments »
Aaaaaaand I’m back! Miss me?
I did treat you to a few posts, shelved prior to ‘the week without tastebuds’ in my house so I wasn’t superbly absent. Interestingly enough, while I recuperated, my blog was inundated with hits, mostly searching for pictures of funny cats. I suppose I’m not so remiss in that area, but this is a food blog!
So it’s December, and the month of Christmas, which means it’s time to bake cookies. Baking for me is highly nostalgic; my mother was a champion baker, if only just for our family. She prided herself on never having store-bought cookies, cakes or anything like that in our home, she baked, and she baked really darn well. If she had one prominent love language to show us, it was in her Baking. She only had to call out “Who wants to help me make cookies?” and I would often drop everything I was doing and race to the kitchen. It was our time to bond, hang out and laugh, not to mention, nibble on warm cookies. Each recipe I have of hers brings me waves of nostalgia whenever I make them- Gingersnaps, Peanut Butter Fingers, Coffee Toffee Bars, Three Layer Bars; they all spelled L-O-V-E in our house. I love to bake but don’t have the benefit of five kids to take away the tempting treats, so I don’t do it too often unless it’s for a crowd, or a special occasion.
Onto the cookies!!!
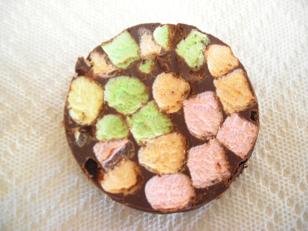
One of Griffin’s favorites is what our family, and likely plenty of others, always calls ‘Church Window Cookies’. It’s a simple chocolate and colored mini-marshmallow cookie, that when cut (and if you squint and engage enough imagination), can resemble stained glass.

(jump for story and recipes
RECIPES:
Church Window Cookies:
Melt one stick of butter and one bag of chocolate chips of your choice, stir gently until smooth, then cool. Pour over one bag of colored mini marshmallows, stir to combine. Either roll into logs, or scoop into plastic drink cups, chill until firm, then slice.
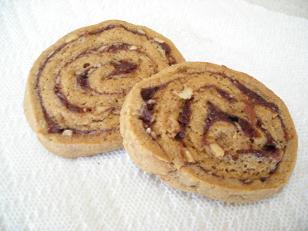
Date-Nut Pinwheels
8 ounce package dates
1 cup hot water
1 cup very finely chopped pecans
1 cup sugar
2 teaspoons vanilla
2 cups firmly packed brown sugar
1 cup butter
2 eggs
3-1/2 cups flour
1 teaspoon cinnamon
1/2 teaspoon soda
1/2 teaspoon cream of tartar
1/2 teaspoon salt
Combine dates, sugar and 1 teaspoon vanilla, and hot water in a medium saucepan. Cook over medium heat until thickened – about 6 – 8 minutes. Stir constantly. Remove from heat and stir in pecans. Set date mixture aside to cool. Combine brown sugar and butter. Cream until light and fluffy. Beat in eggs. Combine flour, soda, cream of tartar, salt and cinnamon. Stir into creamed mixture. Add 1 teaspoon vanilla and mix well. Divide dough into thirds. Roll each portion into a 12″ square on waxed paper. Spread with 1/3 of date mixture. Lifting up edge of waxed paper, gently peel off dough and roll jelly roll fashion. Wrap rolls in waxed paper and refrigerate overnight. Cut dough into 1/4″ slices and place two inches apart on greased cookie sheet. Bake at 350 degrees for 8 – 10 minutes. Cool cookies on wire rack.
Lemon Cream Cheese Cookies
3/4 cup butter, room temperature
1 (3 ounces) package cream cheese, softened
1 cup powdered sugar
1 teaspoon vanilla flavoring
1 Tablespoon lemon zest
2 teaspoons lemon juice
2 cups cake flour
1 cup chopped pecans (optional)
Cream together butter and cream cheese until light and fluffy. Gradually add sugar and beat hard. Stir in vanilla, lemon juice, and lemon zest. Add flour, mixing well. Stir in nuts. Push small amount from spoon onto a greased baking sheet. Bake at 300 degrees for 20-25 minutes or until delicate brown. While hot, roll in powdered sugar.
RECIPE NOTES:
On the Date-Nut Pinwheels, I doubled the filling mixture, using half dates and half dried sweet cherries. This mixture took a lot longer than 6-8 minutes to thicken, likely from the extra bulk. Cook until it resembles a thick paste, almost jam-like, and allow it too cool completely. I also subbed in some wheat flour, and used a little extra cinnamon. The dough was tacky, I treated it somewhat like pie dough, tossing a little flour over it to keep the rolling pin from sticking. Chill the logs thoroughly and keep them chilled while baking. Any extra filling is wonderful spread on toast.
In our version of the Window cookies, we used Ghiradhelli dark chocolate pieces. If you’re going to eat chocolate, why not make it dark?? Don’t sub the fake stuff for butter; trust me, it tastes so much better to use the real thing. We keep these chilled for a better texture. Cool down the chocolate mix before pouring over the marshmallows or they will melt. Using plastic drink cups is super easy; make sure to press the mixture well into the cup for the best effect. When chilled, cut a slit in the side of the cup and break it apart, pushing the solids onto a cutting board. Use a serrated knife and just a little pressure to slice. *Hint* The bottom slice from the cup is the best part!
For the Cheesecake cookies, I added in about 3/4 of a teaspoon of pure lemon extract to give the cookies more pizazz. It’s been my experience with using just zest and juice that it needs a little added something to really make that lemon flavor shine. Instead of adding in the nuts to the batter, I dipped the cookies into the nuts prior to baking, then finished them with a glaze made of lemon juice and powdered sugar.
November 17th, 2006
| 5 Comments »
Coconut Tempters
2 c. sugar
½ c. cocoa
½ c. milk
½ c. butter
½ c. peanut butter
1 t. vanilla
3 c. quick cooking oatmeal
½ c. coconut (optional, but yummy)
Place sugar, cocoa, milk and butter in a medium saucepan and cook to boiling, stirring constantly. Boil 1 minute. Add peanut butter and vanilla, stir until dissolved. Pour over oatmeal and coconut and mix thoroughly, then beat until mixture begins to thicken. Drop by teaspoonful onto parchment paper or silpat and let cool.
A decadent and delicious recipe for Three Layer Bars (also called Nainamo Bars in other parts of the country/world) can be found here on my site . My mother made these bars every Christmas and they are a wonderful treat. I make them at Christmas time for the family still. We all just love them. Another treat from my childhood is Coffee Toffee Bars. I am not sure why they have ‘Toffee’ in the title, as there is nothing even remotely like toffee in them. They are a delightful chocolate/almond/mocha flavored shortbread with a thin and delicate almond glaze over the top. My mom had a specific jelly roll pan that she made them in, and we never referred to it any other way than “the Coffee Toffee bar pan”. It was a heavy steel pan, worn and well used with ornate curved handles. I wish with everything that I am that I still had that pan.
Coffee Toffee Bars
2 ¼ c. sifted flour
½ t. baking powder
¼ t. salt
1 c. butter
1 c. firmly packed brown sugar
1 t. almond extract
1 T. instant coffee
1 pkg. chocolate chips
Mix flour, baking soda and salt. Cream butter. Add brown sugar and cream well. Blend in almond extract and instant coffee. Add dry ingredients, then chocolate chips. Press into cake pan and bake 20 minutes at 350 degree.
Almond Glaze (double all ingredients)
Combine 1 T soft butter, ¾ c. powdered sugar, 1/8 t. almond extract. Add 1 T. milk until frosting is of spreading consistency. Frost bars while still warm.
Here’s a refrigerator dough cookie, delicately flavored and just fabulous. They would be delicious using real lemon juice instead of extract, and possibly a little lemon zest as well.
Lemon Crisps
½ c. butter
½ c. shortening
1 ½ c. sugar
2 eggs
1 ½ t. lemon extract
3 c. sifted flour
3 t. baking powder
½ t. salt
Cream butter, shortening and sugar until light and fluffy, beat in each egg, then flavoring. Stir in sifted dry ingredients. Form dough into rolls, 2 “ in diameter, wrap in wax paper then chill overnight. Using a sharp knife, slice dough into thin wafers and bake approximately 8 minutes at 375 degrees. Keep dough chilled between baking.
Some call them Molasses Cookies, others call them Gingersnaps. We used the latter, and this recipe is wonderful. It was one of my Mom’s favorites. We always made a double batch. Gingersnaps: Combine 3/4 c. shortening, 1 c. brown sugar, firmly packed and 1 egg until fluffy. Add ¼ c molasses and beat well. Mix together 2 c. sifted flour, ¼ t. salt, 2 t. baking soda, 1 t. each ginger and cinnamon and ½ t. cloves. Add to wet ingredients and mix well. Chill dough for several hours or overnight. Shape dough into 1” balls and roll in granulated sugar. Place on greased cookie sheets and bake 12-15 minutes at 350° F.
One more…..another of our favorites growing up. I could eat a whole pan of these.
Peanut Butter Fingers (double all ingredients for a 9×13 pan): Cream together: ½ c butter, ½ c sugar, ½ c brown sugar, firmly packed. Blend in: 1 unbeaten egg, 1/3 c. peanut butter, ½ t. baking soda , ¼ t. salt. Stir in: 1 c. flour, 1 c. quick cooking oatmeal. Spread mix in 8″ cake pan and bake 20-25 minutes at 350° F. Sprinkle with chocolate chips when hot and spread evenly when melted.
|