February 22nd, 2009
| 6 Comments »
We all have events in our lives that aren’t the most pleasant to look back on, but when traced with the correct pencil of perspective we can firmly point out maybe a benefit or two gained from the experience. This Sesame Seared Salmon is one of the good things that came from a not-too-pleasant occasion during my culinary school days.
I was a member of our school’s culinary competition team. The local culinary schools engage in a friendly student competition each year at a big food show that goes on in February. We started our practices in October, meeting once a week to work on knife skills and a four-course menu that needed to be done in a 90 minutes window on the day of the competition. The whole thing was fraught with elements of disaster from the start, mostly due to one team member who was so bloated with self-importance that he refused to allow anyone to tell him what to do or work with anyone else on the team to make it a smooth venture. No amount of nagging or threats could get the team captain to kick him off and replace him with someone easier to work with. We plodded on, although I knew the whole thing was going to be only slightly less catastrophic than a thunderous tsunami.

My part of the team was to do the appetizer and I did a three part salmon plate; one was a Salmon Tartare in a Savory Cornet shell, the other was a Vegetable Bisque with Seared Salmon and the third was bite-sized nuggets of this gorgeous Sesame Seared Salmon. Outside of absolutely loving the Sesame salmon, making a friend for life in my teammate Emily and getting to spend a lot of time with some amazing chef mentors who taught me a great deal, the entire incident was one that I often look at with utmost regret. We placed dead last and quite frankly, it was a little embarrassing to go up against schools who spent an entire year prior to the competition in a class that did nothing but mold them for the end result. We looked like a group of rusty, beat up old clunkers at a Porsche convention.

This salmon, however, was all my creation and I couldn’t have been more pleased with it. I really need to make it more often.

The seasoning is a simple blend of Old Bay, lemon and lime zest, a little squeeze of either juice, salt and pepper and a mix of black and white sesame seeds. Press the fish into the mix, heat a skillet to smoking and drop the fillets in a small puddle of good olive oil. Turn the heat down slightly, cook until the side is burnished and fragrant and flip it over to finish.
 
This meal, indulged in on a kid-free night was so full of flavors that Mike and I could do little else but gaze at each other in awe; firm moist salmon with the delightful citrus-y crunch of the sesame crust and my absolute favorite parmesan-garlic sauteed spinach that ended up perfectly cooked even when I was afraid I over-did it.
I made my own Old Bay style blend instead of buying an overpriced tin of it. I’m really a spice hound and have a huge shelf in my kitchen that is full of different spices. I prefer to make my own blends- I made garam masala when I needed it and was able to make a suitable Chines 4-Spice blend that managed quite well without the star anise. Easy access to bulk spices helps too. The recipe for Old Bay that I found on-line required 13 ingredients- I had 12 on hand.
(jump for recipes)
Come in to my kitchen…
February 9th, 2009
| Comments Off on Sun in February
February is here and the bitter chill we experienced in January will, hopefully, be all behind us. The light is longer in the afternoon; twilight comes around 6:00pm as opposed to 4:30, and with the last day of our arctic first month we had a brilliant thaw- temps in the 40’s, and a balmy breeze that reminded our frozen extremities that yes, Spring does follow winter, and really, it shouldn’t be too long now. Let’s keep our fingers crossed.

My newly adopted African violets seem to really enjoy our sunroom. I was gifted with an entire collection of them after they failed to thrive, and I am really looking forward to seeing what lovely blossoms they will bestow on me. This one poked it’s head out within days of landing amongst the sun and warmth of our house, looking around as if to brightly proclaim “It’s nice here!”
Still, we need some foods to warm us, to take away the icy feeling that comes from old squeaky snow underfoot (more than three weeks since a measurable snowfall), the harsh almost breakable nights where the stars resemble ice shards in the sky and the wind creeps through even the snuggest of weather-proofing. It may be slightly warmer than our bone-numbing arctic blast of a few weeks ago, but that last push through February and into March, where the calendar brings at least the promise of meteorological Spring even if the atmosphere doesn’t get on board, can seem longer and more pressing than the first few weeks in December where everything seems so dark and heavy. It’s like the last few miles of a strenuous trip to a beloved destination; the haul is long, but the end result is oh so sweet.

The month started out with some beautifully sunny days, although today isn’t one of them. The sunshine makes the house feel very cozy during the day, especially in the second floor bedroom. It’s hard not to curl up against the pillows in the warmth, a good book in my hands and a cup of steaming tea on the bedside table, maybe a purring feline against my leg. Just walking into the room propels me into a different mood, like the warmth and sun work in a swift instant to relax me. It’s best for me to just stay downstairs, focused, a worthwhile endeavor at hand, like stirring together a pot of Red Lentil Dhal.

I’ve done this dish before and was thrilled with the results. Why I don’t put it together more often is beyond understanding; red lentils, of all the lentil types available, cook the quickest with such little effort besides a swishing through water. This recipes calls for a deeply aromatic melange of toasted spices and seeds, creating a smoky taste that permeates each bite. From start to finish, it barely ticked 30 minutes off the clock- enough time for me to switch a load of laundry, gaze outside at the sunshine, scratch a soft warm cat ear. Even if it cooks a little too long you’re not worse for wear. And the flavor is so delicious. Scooped warm over some rice with a few crunchy pistachios as a garnish and my lunch was sunshine-y perfect.
Even though the temperature fluctuates between barely climbing to double digits and then turning around and surpassing the freezing mark, the sunshine made everything seem so much nicer, regardless of the number on the thermostat outside. I’ll keep my fingers crossed that the rest of our winter is friendlier, and my eye on more delicious and warming meals like this one.
That’s a pretty tomato isn’t it?? They are surprisingly flavorful for a winter tomato and my brain is working out all kinds of ways to use them. I think it’s trying to trick me into thinking it’s summer time. A girl can wish, can’t she?
(recipes and notes follow)
Come in to my kitchen…
January 16th, 2009
| 5 Comments »
Don’t know gnocchi??- say no-keee or nyawk-eee…. may I suggest taking the time to get to know these delicious, quick and wonderful little pillows of potato dough.
You can make gnocchi from scratch and recipes are all over the Internets to those who choose to undertake the project. I made gnocchi absolutely eons ago, long before anyone even knew what blogging or the internet was, or even, really what gnocchi was. I don’t think they were all that good. I wasn’t all that good then either. So let’s fast forward.
I’ve read over recipe after recipe for handmade gnocchi and quite frankly, I’m not that interested in making them from scratch. It’s one of those labor-intensive recipes that seems easy enough but can be fraught with problems. I love to cook without issues, besides, when the grocer carries a perfectly acceptable brand of shelf-stable gnocchi that tastes wonderful and is a snap to put together for a meal, for what reason would I sweat over a bowl of floured cooked potato if I don’t have to? Right. I’m glad you agree.
The current issue of Eating Well magazine, my most favorite of all the food publications out there, had a very eye-catching recipe for gnocchi and I just had to try it. I knew it wouldn’t appeal to the little carnivore, but quite frankly, this was one of those meals I wanted no matter what. With plenty of leftovers in the fridge, it worked out fine.
Gnocchi is made from cooked potato that is mixed with flour, usually semolina, and sometimes bread crumbs. Gnocchi comes from the word nocchio, loosely translating to ‘knot in the wood’ and has been a traditional Italian offering since the time of the Romans. It is available in all it’s regional forms throughout Italy, although the potato version is considered to be the most recent, ever since the introduction of the potato to Europe in the 16th century.
Behold the gnocchi……from this

To this…..

In about 20 minutes.
And it was all I could do not to eat all of it. This is definitely on the repeat list for us. It was amazingly good.
Gnocchi In a Flash
adapted from the February Eating Well magazine
For the orginal recipe, go <HERE>
1 pkg shelf stable gnocchi
2-3 boneless chicken breasts, cut to strips
1 medium red pepper, cored and seeded, cut to strips
1 bunch spinach, washed and de-stemmed* (equal to a 10-oz bag)
1/4 c. canned diced tomato with italian seasonings
1/2 c. fresh mozzarella, cut into small dice
1/3 c. fresh grated parmesan cheese
Fresh basil to garnish
Season chicken breast strips with salt and pepper. Heat oil in 10-inch skillet, add chicken and cook, stirring occasionally, until strips are cooked through, about 5 minutes. Remove to bowl. Add red pepper and cook 3-5 minutes until tender. Add to chicken. Wipe out skillet with paper towel and add about a teaspoon of oil. When hot, add gnocchi and cook about 5 minutes until browned and slightly puffy. Add chicken and pepper to pan, and in bunches, add in spinach, stirring quickly until it’s all wilted. Toss in diced tomato and mozzarella cubes and shave some parmesan over the top. Stir to mix and allow to cook for 3 minutes or so until hot. Serve immediately topped with fresh basil.
KATE’S NOTES:
The chicken is completely optional in this. Truthfully, it was an attempt to get Griffin to try some. He did, but didn’t like it. The original recipe has no meat in it, but it does have white beans. And no red pepper. I think this version is stellar.
The original recipe called for the entire can of diced seasoned tomato. For whatever reason, I just spooned in a few tablespoons and it was perfect. The rest can be frozen in a baggie for another use.
*A word on fresh greens, like the spinach; I always buy greens by the head. I don’t buy the bags of them at all- too expensive and chemically washed, plus they just don’t last as long- and some markets around me carry the ‘live’ lettuce heads with a root ball attached. They are cheap, mixed and wonderful. I clean the greens as soon as I can after getting them home and place them, wrapped in wet paper towels, in a plastic bag in the drawer of the fridge. They keep for up to a week for the more tender leaf varieties like spinach or field greens, and longer for heartier leaves like bok choy or romaine. Remove any wilted leaves if you notice them.
January 8th, 2009
| 6 Comments »
Not long ago, I spoke about taking baby steps towards chickpea appreciation.
I’m getting there. Slowly.
And also slowly, I’m foraging into my cookbook cupboard and removing a few under-appreciated and under-utilized books; books that hold glorious recipes that make me drop my head back on the chair in a sort of agony, due to my tastebuds sorrow over never having tried it, and how delicious does this look anyway?? And why do I have this book with the almost perfect spine and unstained pages? These bitter days of January, bright with sunlight and diamond sparkling snow are perfect for experimentation, for exploring the vast untapped knowledge in these books. Now that I am getting my cross country skis out regularly, it gives me a much needed energy boost and all that drive needs to go somewhere, doesn’t it? Best get cooking, I say.
Well, hello there beautiful…..

Couscous is about as much fun to say as it is to work with; what other product can you dump in boiling water and forget about, coming back to tender tiny little grains of perfection with zero fuss? What else can be fixed so quickly that you barely have time to chop up a few nuts, or grate some good asiago to mix into it for a stellar side dish? Let’s say couscous….. Cous…..cous.
And this dish turned out gorgeous, if I do say so myself. Brightly colored pepper and carrot nestled up to the rich green of cilantro and with a quick toss of chili garlic sauce, it became just a tiny breath of spice in the mouth, nothing 4-alarm, not a rush of sweat breaking on the brow but just a hint of the heady flavor of chilies. It’s like when you eat something and it evokes a memory that you can’t quite place. Fleeting. Perfect.
Yes, the chickpeas. Right.

I liked the idea of mixing the chickpeas in the all that couscous goodness, the vegetables and bite of chili sauce, but I thought ‘Hey, y’know, they aren’t the right size!’ because it’s all about symmetry in my world- the towels folded edge to edge, the sheets and comforter hanging to the same length on both sides of the bed- symmetry, similar and even. Besides, when faced with a plate of food, especially something like this, it’s all about the teeny-weeny (it is couscous, after all) and so I blended the pepper and carrot in the food processor to mince them fine, whacked the nuts to pieces and took my chef knife to the chickpeas.
I then turned my kitchen into The Flying Chickpea Circus. Did I think at all that those little guys might be quite sprightly?
Oh, and the skins. Ew. That never occurred to me as I lifted my Wustof. I don’t like those skins. But it was time for chin up, marching forward to the finish line. Think symmetry; ignore the skins.


In real time this only took about 15 minutes to pull together, of course, minus the chickpea chasing. I had the vegetables seared and waiting, the cilantro chopped, the nuts fragrant and toasted. A few quick tosses and my fork was present and accounted for, heading to my mouth. So delightful. I think the best part of this dish came later, at dinnertime, as I sat down to a steaming bowl of soup I realized that I wasn’t even that hungry. My small bowl of grains, legumes and vegetables had given me some serious sustenance, a bonus to any recipe.
More chickpea appreciation and a great dish to boot; this works perfectly as a good main course or as a side dish. Increase the chili garlic sauce for your own heat level. Watch for the flying chickpeas.
Spicy Couscous and Chickpeas
The Food and Mood Cookbook by Elizabeth Somer and Jeanette Williams.
1/2 c. chopped pepitas
2 c. chicken broth
2 c. whole wheat couscous
2 t. olive oil
1 medium red bell pepper, stemmed seeded and diced
1 medium carrot, peeled and diced
1 15-oz can chickpeas, rinsed well
1-3 T. chili garlic sauce
Fresh chopped cilantro
Toast pepitas in a hot skillet until fragrant, remove to dish. In same skillet, saute pepper and carrot in oil until soft, about 5 minutes. Set aside. Bring broth to a boil, add couscous and stir, then cover and remove from heat to absorb. In large bowl, combine couscous, chickpeas, pepper, carrot, pepitas and chili garlic sauce. Salt if desired. Top with cilantro.
KATE’S NOTES:
In the original recipe, the nuts listed are slivered almonds, which would be delicious in this. Toast them as well. The original recipe did not call for carrot, but it definitely improves the overall appearance and nutrition of the dish. Whole wheat couscous was my addition and I think the heartier flavor of the grain is a real boon. Thin the chili garlic sauce with a little water to make mixing more uniform. I subbed cilantro for parsley as I like it better.
December 19th, 2008
| 11 Comments »
In getting used to living without dairy in my diet, I have found some easy loopholes for my own personal use of casein. Most everyone lacks the enzyme in their body to digest cows milk protein, or casein, but many people simply don’t recognize any discomfort, or equate it with consumption of milk products. I do not have an allergy to dairy as many people quickly assume; when I eat dairy products I just get a very bad stomach ache as I’ve now been able to recognize that I can’t digest the protein in cows milk. A dairy allergy is when the body can go into shock upon consumption of dairy, or an anaphylactic reaction. My friend Angela has this. For me, it isn’t that dangerous, it’s just uncomfortable. But as I learn to manage this in my daily eats, I have found some interesting outcomes. I cannot consume any milk product made from mass-produced, factory raised cows. Period. A slice or two of supermarket cheese and I am in agony. A blob of sour cream has the same outcome and lets not even talk about cream or milk. Pizza has sadly disappeared from my menu, although sometimes I am willing to suffer for a slice or two, popping a Lactaid to help. But….and here’s the interesting part….. I can consume high quality cheeses, artisan style products that are made from small batches of humanely raised cows, grass fed cows, or pastured animals. These products do not affect me. Top quality yogurts that are chock full of beneficial flora also do not bother me. For these reasons, you will still see some dishes on the blog that contain cheese. I can still eat cheese, it’s just pricier for me to do so and that doesn’t bother me.
But…..back to cream-less pasta sauce.
One aspect of eating dairy free, obviously, is avoiding milk at all costs and thankfully it’s really easy these days as most outside sources such as restaurants, coffee shops and the like will offer a dairy-free alternative, but when I look at a restaurant menu and see pasta after pasta dish with cream sauces and the lone dairy free alternative is red sauce, that ain’t making me want to skip for joy. So I was thrilled upon opening a menu at one of my favorite little bistros to find a cream-less alfredo sauce on the menu. My friend Joanna and I pounced on it as we were splitting an entree that night along with our half-price bottle of wine. I do love a good alfredo, but with the heavy cream and butter, the calories and fat are astounding and now that most milk makes my insides implode, alfredo is definitely off the list.
This ‘alfredo’ dish, however, was made with pureed cauliflower, and although it did have cheese in it, it was an artisan style cheese that my stomach can tolerate. And it was divine. With my first mouthful I swore to recreate this at home.
My first attempt, surprisingly, was pretty good.

Nothing like the wan light of winter to make a food look so unappetizing! But then again, how do you photograph pasta to make it look good at all?
If you’ve ever used cauliflower as a sub for mashed potatoes then you can grasp the concept of this ‘sauce’ made from pureed cauliflower. Cooked until very tender, the cauliflower is placed in a food processor with some of the cooking liquid and processed until smooth. Cheese, salt and pepper is stirred into it, then it is mixed with cooked pasta. I also added in broiled roma tomato for some color and extra nutrition.

The first attempt was pretty good, but more cheese would have added to the flavor and I had thought my fridge held more than it did. It also needed a little more seasoning with the salt and pepper but overall was a really good first try. I think that a handful of chopped kalamata olives would have really sealed the deal. Be sure to cook the cauliflower until it’s pretty tender as it helps to make a very smooth ‘sauce’ once processed.
Cream-less Alfredo Sauce
One medium head cauliflower, washed and sectioned
1/2-3/4 c. top quality shredded parmesan cheese
salt and pepper to taste
Steam cauliflower until very tender, reserve cooking liquid. Spoon cooked cauliflower into food processor and add about a half cup of liquid. Process until smooth, scraping sides as needed. Pour back into saucepan and add cheese, stirring to melt. Season with salt and pepper and adjust to taste, adding more cheese or S&P if needed. Asiago, or romano cheese can also be used to add more flavor to the sauce.
July 30th, 2008
| 9 Comments »
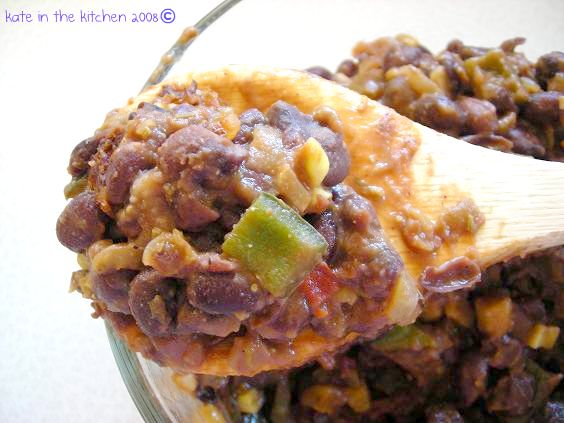
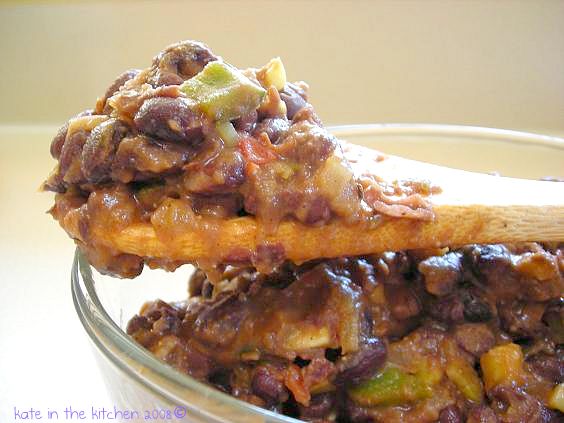
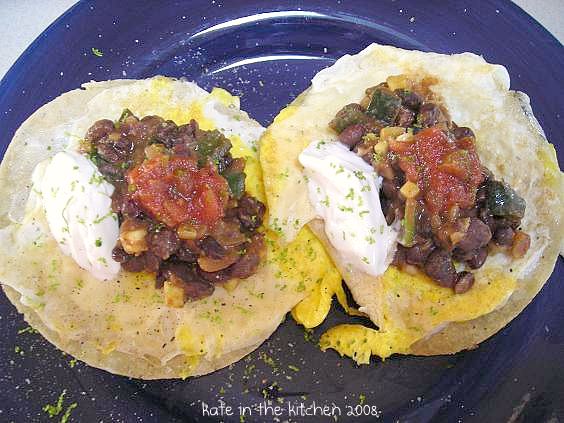
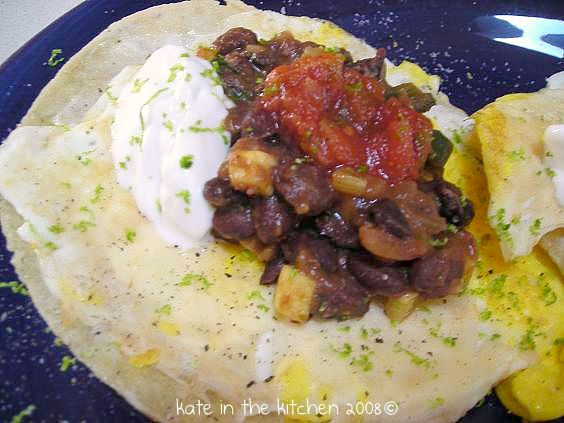
For this recipe, I used an onion, two poblano peppers and a small zucchini, searing the onion and some garlic until it was nicely browned, adding in the pepper for a good 5 minutes or so, then stirring in two cans of black beans. One can I rinsed very well, the other I just allowed to drain a little; the slight amount of extra sodium doesn’t really bother me, and I needed some of that starch for thickener. (most of the time, I rinse them to death…just fyi). I let them simmer for about 10 minutes and made some random mashing motions with the spoon just to break some of them up, then with a little chili powder, ground cumin, lime juice and zest and a spoonful or two of good salsa, the beans were worthy of plenty of chip action.
Oh yeah…..and for plopping on top of my Huevos, showered with lime zest.

April 21st, 2008
| 4 Comments »
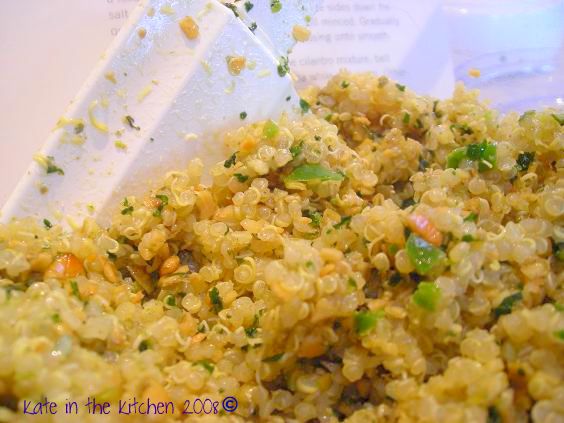
Mexican Quinoa with Pepitas and Cilantro
from The New Whole Grains Cookbook by Robin Asbell
1 1/2 c. water
1 c. quinoa
1/2 c. raw pumpkin seeds
1 c. washed cilantro leaves
2 cloves garlic
1 jalapeno chile
1/2 t. salt
1 t. ground cumin
2 T. olive oil
1 t. lime juice
1 small red bell pepper, chopped
2 scallions, chopped
Bring water to a boil in 2-qt saucepan with tight fitting lid. In medium bowl, wash quinoa well, rinsing with warm water. Pour off most of the water and drain in a fine-mesh strainer. When the water boils, add the quinoa, bring to a boil and the reduce heat to simmer, cover and cook for 15 minutes. The water should be absorbed and small holes will have formed on the top. Let stand, covered for 5 minutes.
In a large skillet, dry-toast pumpkin seeds, shaking pan until they begin to pop. Remove from heat and place in food processor or blender. Add cilantro, garlic, jalapeno, salt, and cumin and process, scraping sides occasionally, until all ingredients are well minced. Gradually add in oil and lime juice and process until smooth. Stir into cilantro, mixing well. Can be served warm, or chilled.
KATE’S NOTES: I followed the recipe faithfully. The only thing I did different was to use roasted and salted pepitas (the seeds) as the store I went to did not carry raw ones. The flavor, at least in my opinion, was highly enhanced by the roasted seeds, which I toasted as per the recipe. You would need to cut back a little on the salt if using a salted seed. I also added lime zest to the sauce. You just can’t lose with that addition.
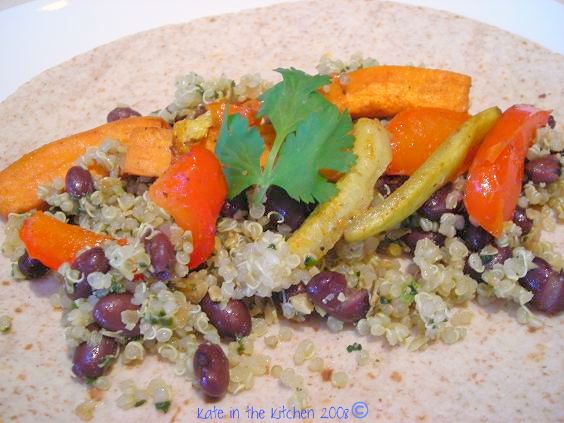
Roasted Vegetable Wrap
Cut one sweet potato/yam, one red pepper and two small zucchini into 2-inch strips. Toss with olive oil, salt, pepper and place on baking sheet. Roast in 400 degree oven for 20 minutes; stir and roast until tender.
Stir one cup of drained and rinsed black beans into Mexican Quinoa. Layer quinoa/beans and vegetables on a whole wheat or multi grain wrap and fold over. Cheese is optional, enjoyment is paramount.
April 2nd, 2008
| 6 Comments »
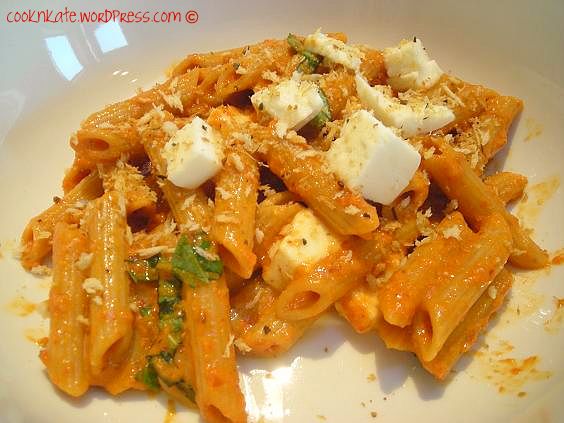
Pasta with Creamy Red Pepper Sauce
Food and Wine Magazine Feb 2008
3/4 pound gemelli
2 whole roasted red peppers from the deli counter (6 ounces)
1/4 cup plus 2 tablespoons extra-virgin olive oil
2 oil-packed sun-dried tomato halves, drained
1 tablespoon tomato paste
1 garlic clove
9 large basil leaves
Kosher salt and freshly ground pepper
1/2 pound salted fresh mozzarella cheese, cut into 1/2-inch dice
Bring a large pot of salted water to a boil. Add the gemelli and cook until al dente. Drain the gemelli.
Meanwhile, in a blender, puree the roasted red peppers with the olive oil, sun-dried tomatoes, tomato paste, garlic and 3 basil leaves until smooth. Season the sauce with salt and pepper.
Scrape the sauce into a large bowl and toss with the pasta until well coated. Tear the remaining 6 basil leaves into the pasta and add the mozzarella. Toss the mozzarella, basil and pasta and serve warm or at room temperature.
Browned Panko Crumbs:
In a small skillet, melt two tablespoons of butter. Add in about a cup of Panko crumbs and stir to combine. I also add garlic and onion powder, basil, oregano, some rosemary, sea salt and pepper. Stir continually over medium-low heat until browned and fragrant. Remove and immediately scrape onto plate to cool. Don’t cool in pan or they will burn; trust me!
KATE’S NOTES:
I roasted my own peppers for this dish. I also lightly browned the garlic in oil on the stove before adding it as I don’t care for the taste (or aftertaste) of raw garlic. This needed a lot of seasoning; don’t be shy with the S&P. I think some of the fresh mozzarella could be added to the sauce before blending, as the whole chunk seemed to be excessive and we didn’t even come close to adding it all in. Stir some in the hot pasta and top it with more; I love the different textures. Add lots of basil to the finished product. I didn’t have quite enough and it seemed to need more.
March 24th, 2008
| 1 Comment »
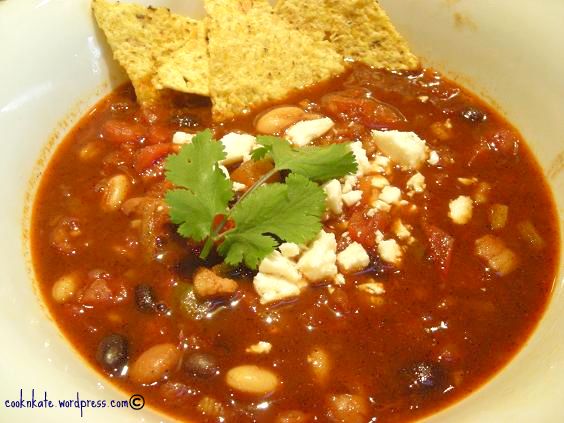
Quick Three Bean Chili
From Food and Wine magazine, April 2008
2 tablespoons vegetable oil
3 slices of bacon, cut crosswise into 1/4-inch strips
1 onion, cut into 1/4-inch dice
2 jalapeños, seeded and cut into 1/4-inch dice
2 garlic cloves, minced
1/4 cup chili powder
One 15-ounce can Great Northern beans, drained and rinsed
One 15-ounce can pinto beans, drained and rinsed
One 15-ounce can black beans, drained and rinsed
One 28-ounce can diced tomatoes
2 cups chicken stock or low-sodium broth
Kosher salt and freshly ground pepper
Chopped cilantro and sour cream, for serving
In a medium soup pot, heat the oil until hot. Add the bacon, onion, jalapeños and garlic and cook over moderately high heat until the onion is softened and the bacon fat has been rendered, about 5 minutes. Add the chili powder and cook over moderate heat until fragrant, about 1 minute. Stir in the beans, tomatoes and stock and bring to a simmer. Simmer the chili over moderately low heat until thickened, about 15 minutes. Season with salt and pepper and serve with cilantro and sour cream.Kate’s Notes: I used a can of chili beans- pinto beans in chili spices, unrinsed! – in place of regular pinto beans; I had it on hand and it worked beautifully. I also reduced the chili powder to 2 tablespoons due to the presence of the chili spices in the beans.
|

