For a simple supper or easy appetizer, these crunchy tostadas are a snap to put together. And they have me craving Summer.
black bean & corn tostadasMarch 21st, 2013 | 2 Comments »
For a simple supper or easy appetizer, these crunchy tostadas are a snap to put together. And they have me craving Summer. curried vegetable & smoked salmon chowderApril 4th, 2012 | 2 Comments »March gave us some exceptionally warm days, but the past few weeks haven’t been quite as toasty. Once the sun drops lower in the sky, I’m still shrugging in to sweatshirts and occasionally drawing wool slippers on my feet. I’ve got soup on the mind, with the chill in the air, but not the hearty simmering pots that I dreamed of in January.
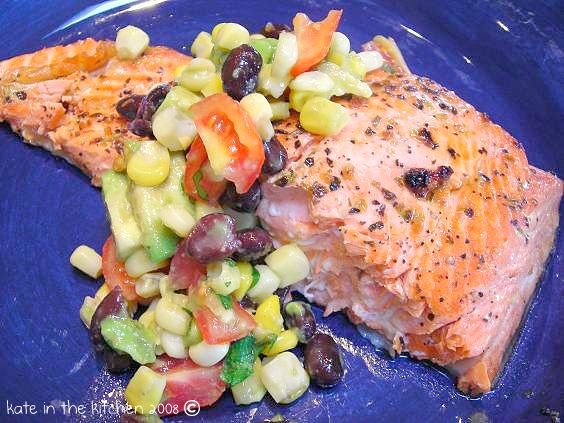
What I’m dreaming about is this succulent chowder, light and refreshing for Spring, brightly colored with vibrant greens and flavored with the rich taste of smoked salmon. This is a simple soup to put together so it won’t be interfering with your outdoor time and you won’t feel bogged down from it when you finish. The first time I made this soup I think we darn near polished off the entire pan. What was left over was barely worthy of lunch the following day, and instead of slipping this in the ‘Done’ pile and never looking at it again, I kept it front and center, and dropped another chunk of lovely smoked salmon in my grocery cart for a second showing. It’s a surprising recipe, as on first glance it just doesn’t look like a whole lot. Then you lift the spoon to your mouth and taste the coconut milk broth, rich with curry flavor, the delicious vegetables and then, the sharp smoky fish. It’s a bit sweet, it crunches and it delights.
The soup is wide open for your own personal interpretation too, employing just about any vegetable you have on hand. You could skip the smoked salmon if it isn’t to your liking, instead adding maybe some grilled shrimp or scallops for a bit of boldness. The curry is completely adjustable too. Add more for a bigger kick, if you like. Or just substitute turmeric to add the bright and sunny color. While I used broccoli and kale, I think green beans and bok choy would be delicious in this soup. Not a fan of corn? Skip it. Add peas instead. Or chunks of dark orange sweet potato. That’s the best part of this recipe; it’s superbly easy to make it your own.
black bean tostadasJune 5th, 2011 | 5 Comments »I’m always on the look-out for quick and easy meal options, ideas for those nights that the guys take over dinner prep and want some good food to appear without a great amount of fuss. Long winded recipes don’t cut it with them, but these really easy Black Bean Tostadas make for a perfect summer dinner.
Based on this idea for a Black Bean and Corn Pizza, I took it one step more towards simple and used corn tortillas for the base, making a crispy shell that went from our toaster oven to my plate in about 10 minutes. The most time I spent was opening a can of black beans and shaking them under running water. If you’ve got a toaster oven you’ve got the means to make this in a snap but are limited to only two at a time. Using a regular oven makes for more crowd appeal. Increase the amount of all ingredients as needed for the number of people you’re serving. I would imagine that adults could easily eat two or three of these. I myself managed to shotgun four without a blink of remorse.
But I was stuffed. Happy. But stuffed. Delicious as a main meal, this would also be perfect for a nice appetizer, and could easily be done on a grill with tantalizingly smoky results. The black beans make for a hearty and filling addition and no one will miss any meat in this. Fresh tomato gave it a summery flavor, and a crumble of queso fresco would be a nice addition just prior to eating them.
getting back in the gameJanuary 9th, 2011 | 6 Comments »I know, I know…. there you all are, patiently waiting for me to get my caboose in gear and start posting the food posts again. Enough of the extraneous stuff! Bring on the food! Get cooking again, would you? I can hear you all, I promise. And it’s good too, because it’s tossing me head-long back into the kitchen to start these next 12 months off in style. With Amazing Wild Rice Stuffed Peppers
Honestly, I have no clue what happened to me between Christmas and New Years but I had ZERO desire to cook a thing. Nothing. Who was that girl? I get an extreme amount of pleasure in the kitchen; I love the act and the art of cooking, pulling something from the stovetop or oven that fills the room with incredible smells, moving tastes about on my tongue and delighting in the flavors within. This is who I am, it’s what I love. But there was that week, that flux week between holidays that always just feels odd, like the end of something when we’re not quite ready for the new thing to begin and everything in me just went swirling down the proverbial toilet. Good thing for a loving spouse who made a few meals and for copious amounts of leftovers. But then, I came roaring back with an idea, a brainstorm that drove me to a creative new height. I wanted something light, healthy and easy to put together. I wanted to add a new line to my ever burgeoning arsenal of recipes, the list I go to time and again, options that fall into place in our dining repertoire with ease. What jumped out from under my hands was this Wild Rice Stuffed Pepper, that despite being completely meat-free, the Teen did eat part of his without one iota of complaint. There was no suspicious poking at it, no scowling or contempt.
Yeah, who was that kid, you say? Mine. The young man who seems to be changing every day that I look at him, the one approaching his 17th birthday. He’s become a bit more acceptable to new things, less rigid about what he won’t eat. I’m liking the results. Really, the adjectives necessary to describe this dish are extravagant. Mind-boggling. Flavorful and light, but hearty and comforting as well. Mike and I loved these too, but then, I knew we would. We’d be meat-free more often if it weren’t for the Carnivore. This dish, once the lovely colored peppers were home from the market, came together entirely from my pantry and freezer. I love those types of meals. Opt in the fresh produce, fill the edges with staples and sit down to a lovely meal. This is the cooking I like.
Wild Rice Stuffed Peppers 3 colored peppers of choice, sliced in half and cored
In a medium saucepan, bring 4 cups of water to a boil. Add the wild rice, return to a simmer and cook, covered until the rice is tender 30-40 minutes. I used long grain, or regular wild rice so it took longer than if you use the cracked version. Adjust simmering time accordingly. Once rice is tender, drain excess water in a wire strainer and set aside. Meanwhile, set your oven to Broil. Line a baking sheet with foil. Place prepared peppers on sheet, cut side up and broil for about 5-7 minutes, until edges are slightly browned and peppers are softened just a little. Remove from oven, set aside and set oven temperature to 400°. In a deep skillet, saute shallot in oil for about 5 minutes, then add garlic and cook about a minute longer. Add the beans and corn, and heat through. Stir in the tomato and wild rice until just combined and remove from heat. Add the cheese and panko. Season to taste with salt and pepper. When mixture is cool enough to handle, pick up a generous handful and press it together slightly, then mound it into a pepper half. Repeat with remaining peppers and filling, mounding the peppers full. You may not use all the filling but be generous. In a small bowl, place about a half cup of the shredded cheese and several tablespoons of shredded parmesan. Add two tablespoon of panko bread crumbs and toss to coat. Top the peppers with this and place in the oven for about 15 minutes, or until the filling is hot and the cheese on top has melted. Serve immediately.
KATE’S NOTES: There is endless versatility in this recipe: use brown rice and black beans, or regular rice and red beans. Add frozen peas or even cooked cubes of squash. Add in a host of fresh herbs. Skip the panko to make them gluten-free. It helps to bind the ingredients but I will say that it’s not necessary at all. Change up your cheese, or add chopped leftover meat if you have it.
curried sweet potato & corn risottoDecember 13th, 2010 | 7 Comments »Risotto is one of those dishes that scares people. Somehow it’s considered a demonic culinary principle, a dish that’s reserved for restaurants and someone willing to stand over a steaming pot and stir, stir, stir, stir until their arm falls off. Who has that kind of discipline? While there is some truth that risotto is time consuming, and does need attention, I’ve managed to make beautiful creamy pots of it by simply standing by, keeping the flame tempered and making sure the rice doesn’t stick. And I don’t focus on it diligently, spoon in hand, because I’ll tell you something that may force some die-hard, principled professionals to throw rotten tomatoes at me in dispute- risotto does not need to be stirred constantly.
So there, I said it, and I will uphold this truth until the day I die. I’ve done it both ways. I’ve stood by that pot stirring until I am completely zoned out by the motion, and I’ve dumped in the broth, given it a couple of whirls with the spatula and walked away. Yes. I’ve walked away from risotto and lived to tell the tale. While this is no meal to get on the table quickly, with some time and a bit of care, you can make it without making yourself crazy. And one comforting thing you ought to know about me, for as many pots of creamy perfect risotto that I have managed to get out of my kitchen, there have been plenty that have failed miserably. They’ve gotten over-cooked and mushy and just downright wrong. Both from being constantly stirred and not, just so you can’t point out a fault to my procedure. Make it perfect one time and you feel like a genius. You do it again, bursting with confidence of your skill and the next pot is like sloppy porridge. Ugh. My only suggestion to mastering risotto is to just make it. And make it again, and again and again because you will learn to watch the rice kernels and see how they change (whether you are stirring constantly or not) and you will see how it transforms with the broth and added ingredients from singular grains to a homogenous dish. And please take comfort in the fact that this particular risotto that I’m going to talk about came out a bit overcooked.
But it tasted amazing, and that’s the focus of whatever risotto you make, whether the texture is perfect or not, think more of the taste and the flavors in your mouth and less that it needs to be some level of award-winning achievement. There is no such thing as perfection, especially in cooking. Risotto is one to never give up on, too. This Curried Sweet Potato & Corn Risotto was another Iron Chef moment for me; I needed a dinner plan, yet again at 3:30 and scanned the cupboards and fridge for options. There was arborio rice and there was a stack of sweet potatoes on the counter. And there was corn in the freezer. My brain suddenly jumbled this all together, along with the bright sunny curry colors and I sat down to determine the best way to make it work. I settled on shredding the sweet potato in order to incorporate it more evenly in the cooking process, and adding the frozen corn in the last 5 minutes to cook it just enough but to preserve some of the crispness of the kernels. The end result, despite being, like I said, slightly overdone, was a superb flavor, and so cheerful in our bowls.
Curried Sweet Potato & Corn Risotto The entire process for making risotto will take 35-45 minutes. For the last 15 minutes or so, you probably will need to stick close to the stove and stir more, but the first part of it can be somewhat unattended. Many risottos use wine, and are finished with parmesan cheese. For this curry version, I did not use wine or cheese as I didn’t think it would match with the flavors of the curry. 1 c. arborio rice (or carnaroli works too) In a medium saucepan, heat the stock to a bare simmer with the fresh thyme sprigs, and two cloves of the garlic that have been roughly chopped. Stir and keep warm over low heat. For the remaining two cloves of garlic, mince very fine. In a large, deep skillet, heat 2 tablespoons of olive oil (or use butter, or both- that’s what I prefer) add the garlic and saute over medium heat until fragrant, stirring to prevent scorching. Add in 1 tablespoon of curry powder and stir to blend, then add in the rice. Stir to coat the rice with the garlic and curry powder, and cook, stirring regularly, until grains are somewhat translucent, about 5 minutes. Ladle about two cups worth of the warm stock into the skillet with the rice and stir to blend. Maintain a gentle simmer, stirring on occasion, until the stock is absorbed. Be sure that the rice does not stick to the bottom of the pan. The mixture should simmer gently, but never boil vigorously. When the grains have absorbed the stock, ladle in about 2 more cups worth. Repeat, allowing this to absorb and keeping the grains from sticking. You won’t need to watch it constantly, but stay close and just check it occasionally. After the second round of stock is absorbed, add about a cups worth of shredded sweet potato to the rice, and a ladle or two of stock. You want to give it enough liquid to loosen it and allow it to simmer, but not so much as before. Stir and allow to absorb. Add another ladle, and repeat. Now test a grain or two. They should begin to yield to your bite, with some firmness remaining. Add in the corn, a few more ladles of stock and simmer until the liquid is absorbed. Test the grains again. At this point, the mixture should look smoother and beginning to come together with a creamy sauce. Keep testing the grains and adding just a little stock if needed. If you like the idea of more curry flavor, go ahead and stir more curry powder in to the grains. By now, you will probably be stirring a bit more to prevent sticking. Stir, test the grains and add a little more stock until the mixture has a wonderful creamy texture. Season it with salt and pepper and serve as soon as possible. Risotto doesn’t always hold well.
C is for CornSeptember 11th, 2009 | 3 Comments »For anyone holding the September issue of Gourmet magazine, you’ve no doubt been taken in by the Vegetables A to Z index, and maybe like me you’ve been drooling over the rich bounty of recipes to help you with the expected garden delights that you’ll have at your disposal in the weeks ahead. I love the idea of sweeping through the end of the gardening season in grand fashion, drawing the curtains on Summer and ushering in the glory of Fall, cool weather cooking and warm hearty dishes. Our summer hasn’t been all that hot, really, and I’ve toyed with the desire to make a steaming pot of soup last month to ward off some cool evenings. Now September has come, and it won’t feel so odd to consider soups, a good stew or an afternoon of baking. It’s a September sort of thing. And along with the alphabet offerings in the magazine are menu options composed entirely of one letter. Being somewhat of the orderly sort, I first drooled over the ‘C’ menu with it’s Cold Cucumber and Cubanelle Soup with Cashews and Chives, the Caramelized Chipotle Chicken, and this delight, Cheesy Creamed Corn with Cilantro.
Corn season has begun in earnest here in Minnesota, and trucks at the markets are overloaded with cobs. It’s not at all unlikely that when I hand my bag to the kindly people behind the tables that they dole out an extra ear here and there just to whittle down the mass behind them. I’m happy to relieve them of their bounty as sweet corn is a fleeting season, and an even more fleeting taste. It’s best still rich and moist with the morning dew, it’s silk wet and sticky and the shucks thick and damp. Peel it down, cook it any way you wish, but for me, an ear slathered with real butter and sprinkled liberally with salt is the finest means to chomp through my haul. However, this recipe is really delightful as well.
The corn is stripped from the cobs prior to cooking, then sauteed in a skillet with green onion and garlic, mixed with a little milk and cornstarch and topped with cilantro and a crumbling of queso fresco cheese. It’s pretty simple, and a cinch to pull together. The corn taste is out of this world delicious, a tiny hint of of onion kissing every bite and the rich creaminess beats anything that could come out of a can. I served it with my favorite Parmesan Grilled Zucchini and a fresh garden tomato for a light, simple and quintessential summer dinner. Cheesy Creamed Corn with Cilantro 3 T. unsalted butter Heat butter in a wide and deep skillet and add corn. Stir to coat and cook, stirring occasionally until it’s bright yellow, about 5 minutes. Add in onions and garlic, stir well and cook for about 3-5 minutes more. Whisk milk and cornstarch together and pour into pan, stirring to combine well. Allow to simmer for about 2-3 minutes, then serve corn topped with cheese and cilantro. Minimal salads, maximum enjoymentAugust 1st, 2009 | 8 Comments »Are you a one-track mind kind of person when it comes to your salad? Does it have to be green, with cukes, tomato, a hard crouton or two and some type of dressing or it can’t possibly be a salad? If that’s the case, then you might want to skip this post.
While I certainly have enjoyed my share of salads this summer, resplendent with leafy field greens, dark spinach leaves and all manner of vegetable toppings and extras, I serendipitously came across the be-all to end-all of salad options recently that has thoroughly taken my mind off the standard greens and placed it smack in the middle of Salad Experimentation Land just as the peak of summer produce has me reeling with endless possibilities. Each of these salads took about 10 minutes to put together, if even that. And every one of them simply shouted with flavor.
Lemony Garlic White Beans 1 15-oz can great northern or cannelini beans, rinsed well In a medium bowl, combine beans, tomato, lemon zest and basil leaves. In a small skillet, warm olive oil slowly with thyme leaves and crushed pepper. When hot and leaves are sizzling slightly, add garlic slices and cook gently until lightly browned. Stir in lemon juice, then pour over beans and stir carefully to combine. Mash some of the beans slightly and season with salt and pepper. Add more oil if too dry. Chill for an hour or two, then stir before serving. Can be eaten alone, a topping for toasted bread or a filling for an omelet.
Lime Infused Carrots Combine carrots, juice, zest and oil in a bowl. Season with salt and pepper and stir in pepitas. Allow to chill before serving.
Chipotle Corn and Pinto Beans Combine all ingredients in a bowl and stir well. Season with salt and pepper and chill for about an hour. Taste before serving and adjust seasonings if needed.
This is just a sampling of the 101 salad options I found. The best part of it all is that the suggestions are just baselines for your imagination. That carrot recipe was an off-shoot of the original listed, and the Chipotle Corn salad didn’t have either shallot or sweet pepper in it, but I had them on hand and knew they’d be excellent. The bottom line is simple; the recipes are perfect just the way they are. They’re so easy that cooking skills aren’t even seriously required, but if you’ve got the wherewithal to spark some alternatives, add something with extra pizazz or just take it in a whole new direction, then you could spend now until the coming of winter playing with this list. What are you waiting for? It’s already August!! Sides to delightMay 14th, 2009 | 1 Comment »
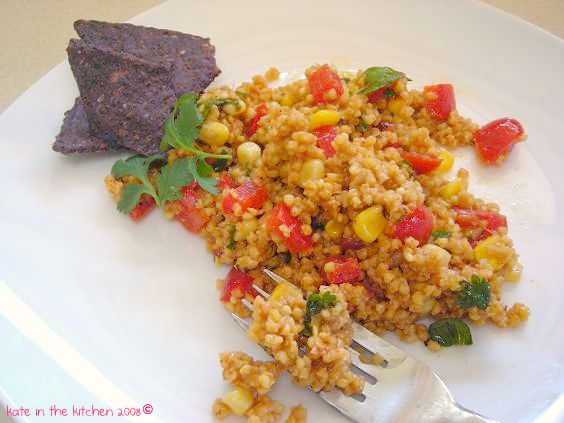
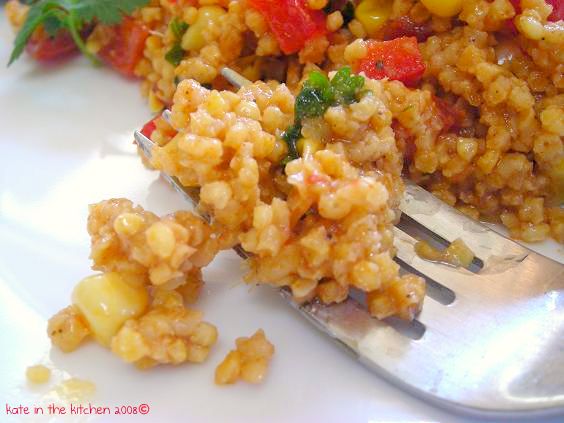
I’ve been holding out on you, but not on purpose. I’m guilty of thinking that somehow giving you a simple recipe as a means to serve frozen corn might just bore you to death. Really, it isn’t anything superbly fancy, but right about now, as we are staring down the summertime bounty of vegetables and with fresh corn season coming quicker than a May thunderstorm, I think it’s time to share the love. Especially since I enhanced the dish with my current love- bulgur- and made it a couple thousand times better. I don’t even know when it was that I came across this method on Kim’s blog, but I was immediately transfixed and had to try it. Which I did, and which I almost regretted because I could barely think of anything else. Now I need to share it with you.
I simply call it Brown Butter Corn. How easy is that? You take some good butter and heat it in your pan until it’s toasty and brown, add in frozen corn and cook it until it’s tender and delicious, maybe tossing in a handful of fresh basil, or rosemary, or thyme and a seasoning of sea salt and fresh ground pepper. Pile it on your plate next to your main course and you’ve elevated your meal slightly from the humdrum to the hubba-hubba. (wow, did I just say that?)
Only this time, with a container of my current whole grain love all cooked and ready in the fridge, this side wasn’t just about the nutty and toasty, it was far better. Copious amounts of fresh basil really sent the flavor sky-ward. And with a perfectly cooked piece of Mahi-Mahi as an accompaniment, alongside an effusive smiling husband (and a kid-free evening), it quickly became one of those meals that sends shivers through you, making you slow down, smile more, sigh often and think “When can we have this again??” Brown Butter Corn with Bulgur 4 T. good quality butter Heat butter gently in a large skillet over medium heat. When it’s darkened and smelling toasty, add corn (it will sizzle!!!) and quickly stir to combine. Allow to cook for about 10 minutes, stirring often. Add in bulgur and fresh herb, stir to combine and heat through. Season with salt and pepper. KATE’S NOTES: Black Bean and Corn RelishJune 30th, 2008 | 3 Comments »
Black Bean and Corn Relish by Kate 1 15-oz can black beans, drained and rinsed well Mix all ingredients together in a non-reactive bowl. Chill before serving. Also tastes great on tortilla chips. Millet Salad with Corn and PepperMay 27th, 2008 | 7 Comments »
African Millet Salad with Corn and Peppers 3 T. olive oil In a 2-qt saucepan with a tight fitting lid, heat 1 T. of oil and saute onion until golden. Add garlic and ginger and cook for one minutes, then add paprika, black pepper, allspice, and cayenne and cook for one minute more. Wash millet quickly and drain; add to pan and stir, coating grains and cooking until hot to the touch. Add water and salt and bring to boil, then reduce heat and simmer on low for 20 minutes before checking for doneness**. When all liquid is absorbed and grain is tender, cover and remove from heat, allowing to steam for 10 minutes. Scrape millet into bowl and cover, then let cool. Whisk remaining oil with lemon juice and brown sugar in a small bowl. Stir corn, bell pepper, tomato and parsley in with the millet, then drizzle dressing over and stir to coat. Serve topped with peanuts.
KATE’S NOTES:
I used cilantro in place of parsley as I had it on hand; a red bell pepper instead of a green (don’t care for green) and frozen corn instead of canned.
**Despite following the cooking instructions faithfully, the grain, I felt, came out to be a little chewier than I expected and being unfamiliar with it, I contacted the cookbook author to ask her opinion on the texture. Her response was that millet can often be confounding in that way, and the amount of water listed in the recipe can sometimes be less than needed and other times it’s just enough. She feels this is simply one aspect of the grain’s natural humidity level, and can be adjusted during the final cooking stages. Once the grain has absorbed all the water, she suggested to quickly stir and remove a few pieces to test for tenderness, and if it is still firm and chewy to add in a little more water- 1/4 to 1/2 cup- quickly bring the temperature back to boiling, then reduce and simmer again for another 10 minutes. |