February 16th, 2010
| 8 Comments »
Last year wasn’t my favorite year. Come to think of it, 2008 tossed some bombs my way and it all seemed to carry over, spreading out over time and trying to suck all the life out of me at every turn. As 2010 approached, and I looked back on the 12 months behind me, it was a bit sad to see that I’d paid far too much attention to the valleys in my life, and forgot to take in the view from the peaks.
Life is all about valleys and peaks. We’re up, we’re down and when we’re not, there’s the climbing out of the abyss and of course, slipping as we fall back into it. Sometimes our peaks are long, straight paths that resonate with light and glory, and we feel great. For a long time. Life is good and we breathe easy. But we slip, once more. The valleys can be dark. It’s hard sometimes to keep remembering that it doesn’t last forever. I’ve struggled to keep my chin up, part of me wishing fervently that this time of trial would just end already because really, I’ve had quite enough, thank you. Then I always realize that I’m climbing once again.
One aspect of 2010 that I’ve really wanted to do more of was to keep focused on the good, even when it seemed like there was nothing but darkness all around me. Fortunately, we’re only 6 weeks in, and what few dark moments that presented themselves passed rather quickly. It’s exciting to see the Earth changing around me, to notice with delight that there is still light at 5:45pm, that the tilt of the sun has changed enough to make 15° in February feel way different than it did in January. Or December. We’ve been absolutely dumped on in terms of the snowfall, and it’s given us quite a gorgeous landscape to look out over, and some stellar cross-country skiing. But beyond the natural turn that is happening, and the shorter amount of time between us and the arrival of Spring, it seems like there’s a whirlwind of good happening around me too. I hope to be able to share much more of what it entails as it pans out, but right now it’s slowly starting to twirl, like a tentative pirouette, moments of time pressing together and gradually expanding that are quietly whispering “Soon. Be Patient.”
The famous poem ‘Desiderata’ by Max Ehrmann has a line that says “… and whether or not it is clear to you, no doubt the universe is unfolding as it should.” For a long time it just never felt clear to me, it felt more like I was standing still while the world twisted and moved on around me. That’s changing, as is my perspective and I’m grateful. I’ve had this sensation inside me for a while now that I’m standing at the edge of a cliff, and everything in me knows that I just have to leap despite the voice in my head that’s saying “No- step back! You’re really scaring me!” I’m in my Indiana Jones moment, on the edge of that precipice. And this is my leap of faith. There is a bridge there that will catch me, even though I can’t see it.
There is one aspect of this extended time of trial in my life, and that is being available to just stop and enjoy those tiny moments along the way that can be so easily overlooked. Sitting down for a cup of tea one day really opened my eyes as the square cup seemed to fill my hands so perfectly. Moments of clarity that come from spending days with my almost 2-year old niece Nina,losing track of myself for awhile as I see life through her eyes. A Fall hike on a misty day that seems to leave the world around me at a standstill, smothered in the thick, wet air.
And with food too. Simple, easy and nourishing; stopping myself long enough to savor my lunch or an afternoon snack, taking the time to taste, smell and appreciate what’s in front of me.

I’ve spoken out for these garlicky white beans before, urging you to try them and fall in love with their simplicity like I have, the endless ways they can be dressed up as a quick yet nutritious meal. One bright and sunny afternoon I set out to simply stir together this favorite of mine, and as I perused the pantry, fridge and countertop, I reached for a can of tuna, half an avocado and some washed spinach, which when paired this time with lime zest and juice instead of lemon, made yet another winning combination. Great taste, good for the body and with the first few bites, apparently very good for the soul.

White Bean and Tuna Salad
by Kate
1 15-oz can great northern beans, drained and well rinsed
1 3-oz can of tuna, drained
2 cloves garlic, thinly sliced or minced
1/2 a ripe avocado, diced
1 c. fresh spinach, washed and chopped
Lime zest and juice to taste
Fresh thyme (optional)
In a medium skillet, warm about 3 tablespoons of oil and add garlic, sauteing gently until lightly browned. Add in the beans and tuna and warm, stirring to combine. When hot and steaming, add about half the spinach and stir until wilted slightly. Repeat with remaining spinach. Grate in some of the lime zest and squeeze in about 2 tablespoons of the juice. Stir and taste. Season with salt and pepper, more lime zest and juice if desired. Remove from heat and scrape into a bowl. Add the avocado and gently mix it in. Sprinkle with thyme and serve warm with rye crackers if you wish, or toasted pita bread.
January 27th, 2010
| 25 Comments »
Winter weekends sure can be a mixed blessing. You’ve got an entire day spread out in front of you with endless possibilities; time on your hands and hours to make just the way you want, and yet, if you’re like those of us in Minnesota, you often wake on those long days to crackling cold air and sunshine thats full of promise but delivers nothing in warmth.
Those are the days that just require waffles.

There’s something about a crisp and aromatic waffle that deems it a culinary perfection for a chilly winter morning. A morning that you know needs to lead to a productive day. A morning where the coffee pot seems to be endlessly working, where your pajamas are often more desirable than a pair of blue jeans, mornings such as one that finds you casually sipping your brew, and noticing that the bright sunshine has highlighted your neglect of the vacuum cleaner, the dustmop and a Swiffer cloth or two.
I’m sure others can relate, right?
I grew up with Sunday morning waffles. It was eagerly anticipated to come down the stairs to the pungent scent of the percolator on the stove as it bubbled away, competing with the creaky old waffle iron, hissing emphatically, cranking out perfect rectangles of golden hued delectable treats. I do love pancakes, especially ones that stray off the beaten track of breakfast food; pancakes with shredded apples and yogurt in them, bananas and pecans in a whole wheat pancake, chocolate chip flecked ovals cooked to soft perfection and then topped with summer cherry sauce. Pancakes even spread with peanut butter and eaten out of hand. Oh, do we know about pancakes in this house, yes we do. But waffles, why there is really no other means needed to enjoy them other than good butter and syrup, because the waffle, in all it’s dented glory is the perfect palate to top with a few slices of cold butter and then drizzle warm maple syrup over to run through tunnels, cubes and edges to dress them in sweet buttery delight. Those edges crunch, the syrup absorbs and the bites come together in the mouth, a marriage to linger over, knife and fork in hand, coffee to the side. I’ll eat pancakes for dinner, and often we do, but waffles are strictly breakfast, and best on the weekends when their sturdy personality buoys you up for the long day ahead.
And who wouldn’t love the crunchy and wholesome addition of some cornmeal to the waffle?

I’ve made cornmeal studded pancakes before, and really, they’re pretty good and all, but there’s something about the added crunch of cornmeal on batter placed in the waffle iron that just sort of gets me right there. I don’t know how to describe it any more than that. And when I came across the recipe for these crunchy beauties on Kristin’s lovely blog, somehow I knew I would adore them like a treasured memory so I put together a double batch. People, I made waffles for hours, it seems. Hours. Did I care? Oh no, not at all. You see, after I made the first one and dressed it appropriately, I consumed it with gusto. My tummy, loving the introduction of it, politely asked for another. And I complied. The batter seemed endless, but I stockpiled waffles for the next few days and two packs to go into the freezer. We are happily away in waffle ecstasy. Don’t bother to look for us, ok? We’ll be fine, really and I will come back when they’re gone and do it all over again.
Oh yeah, and after I ate that delicious breakfast, it spurred me on to clean my house from top to bottom and boy, did it look nice in the dazzling but cold winter sunshine then. All thanks to a perfect little cornmeal waffle.
Buttermilk Cornmeal Waffles
(from Kristin at The Kitchen Sink Recipes, slightly adapted from Gourmet magazine)
1 cup sifted all-purpose flour (sift before measuring)
1 cup yellow cornmeal, preferably stoneground
2 teaspoons baking powder
1 teaspoon baking soda
1/4 teaspoon salt
3 large eggs
2 cups well-shaken buttermilk
6 tablespoons vegetable oil plus additional oil for brushing waffle iron
Into a large bowl sift together flour, cornmeal, baking powder, baking soda, and salt. Repeat sifting 2 more times.
In another large bowl whisk together eggs, buttermilk, and oil. Add flour mixture all at once and whisk just until combined.
Preheat a waffle iron and preheat oven to 200 °F.
Brush waffle iron lightly with additional oil. Spoon batter into waffle iron, using 1/4 cup batter for each 4-inch-square standard waffle and spreading batter evenly, and cook according to manufacturer’s instructions. Transfer waffle to a baking sheet and keep warm, uncovered, in middle of oven. Make more waffles with remaining batter in same manner, brushing waffle iron with more oil before adding each batch.
Serve waffles with syrup.
January 23rd, 2010
| 16 Comments »
 
It’s not often that I wish something so rich, so decadent and addicting on my readers. Me, of the ‘You should try this quinoa!’ and ‘Have you ever had such amazing black beans!’ and “Ooooh! Soup!‘ posts that gently encourage health through your food and yet when I come across such an incredible recipe for hot fudge sauce, something that takes all of about 10 minutes to make for an indulgent return of gasping through each sultry chocolate-y mouthful, here I am devilishly trying to get you all to break those hard-core resolutions with a spoon and a wink. On top of ice cream, even.
But please do so, if you are so inclined. While I am a firm believer in taking control of one’s health, of making the changes in your body and spirit that give you the wherewithal to pump your fist in the air and shout “YES!” when you step on the scale, or easily slip those old jeans over your hips, at the same time I also emphatically feel that we can’t achieve our successes when we deprive ourselves of everything in the name of health. Life should be about balance. Enjoy some hot fudge, really enjoy it but not every day and for Pete’s sake, please share it with those you love because that’s what food is all about, isn’t it? The look on their faces when they spoon the first deep dark bite into their mouths and run their tongues over the silky smooth sauce and you’ll be fist-pumping for yet another reason because you totally made someone’s day. Make that one of your resolutions this year too, hmmm?
Decadent Hot Fudge Sauce
(from The Silver Palate Cookbook, with adaptations)
4 1-oz squares unsweetened Bakers Chocolate
3 T. unsalted butter (NO substitutions- be WILD people!)
2/3 c. water
1/3 c. sugar
1/3 c. light corn syrup
Pinch sea salt
1 T. pure vanilla extract (or get even more crazy and add real rum, cognac, amaretto……you get the idea)
In a small saucepan over very low heat, melt the chocolate and butter together. Do not stir, but occasionally agitate the pan to distribute the heat. Alternately, you can use a double boiler. In another small pan, bring the water to a boil.
When the chocolate is fully melted, pour the boiling water into it, then stir in the sugar and corn syrup. Stir to combine and bring back to a boil. Reduce the heat so that it simmers gently, but not violently, and allow to boil for about 10 minutes. You can stir it occasionally, but it’s really not necessary. After 10 minutes, remove it from the heat and stir in the flavoring. Allow to cool for 20 minutes or so, then spoon it over ice cream.
This can be chilled too, and reheated in the microwave. Stir to combine before serving. Enjoy it immensely.
December 20th, 2009
| 14 Comments »
Those Sugar Plums, the ones that dance in the head during the long winter slumber in the most familiar Christmas story that’s likely ever been written. How did I get to be this age, with a teenager and a husband, long gone away from treasured annual reads of that classic story each year, the retelling of Santa’s magical visit, and not have any clue what a real sugar plum entailed? I want to kick myself.

Because, I’ll tell you something, and this is no small truth. Had I known about these delightful, sweet and simple little treats prior to this past week, how easy they are to put together and how eager and surprised everyone looks when you pull out a container and say “These are Sugar Plums. Yes! THOSE Sugar Plums!” I’m telling you, it would be all I need and I’d have been cranking out these nutty fruit-filled, orange-scented orbs the moment the calendar page flipped over to the month of Christmas.

My hope now is that I don’t go so far into overkill that I never want to see a dried apricot again. The delight and flavor and simplicity of these might possibly have that effect on me. Good thing Christmas is just a few days away. It’s a bit embarrassing, really, to be so interested in food of all kinds, the history of it, the stories it can tell and not be aware of this confection. But that’s what we have friends for, isn’t it? To enlighten us? To share the wealth?
And little could be simpler than combining rough-chopped nuts and dried fruit in a food processor along with honey and orange juice and whirring it all into an utterly fragrant crush of flavor. Even the rolling of the mixture was contemplative, as the sun warmed my backside and Miles Davis kept me company with his sultry trumpet. A late afternoon of putting together a Christmas fiction and ballet classic that I know I will love for years to come left me feeling a lot more festive than I have been lately. With the addition of a fragrant tree, dragged through a snowy wood, and boxes filled with a lifetime of memories and nostalgia also added some much-needed holiday spirit to my life. If all I need to do that is a few packages of dried fruit and some bags of nuts, then holidays from now on could become much more simpler. One can only hope, anyway.

Sugar Plums
Recipe from Field Guide to Candy by Anita Chu; Quirk Books, 2009 (and Susan)
2 cups almonds, toasted and roughly chopped
1 cup dried apricots
1 cup pitted dates
1 teaspoon ground cinnamon
2 teaspoons grated orange zest
2 tablespoons orange juice
1 tablespoon honey
Unsweetened flaked coconut for rolling
1. Line a baking sheet with parchment or wax paper.
2. Combine almonds, apricots, dates, cinnamon, and zest in a food processor and process into a finely ground mixture.
3. Add orange juice and honey, and combine until the mixture becomes a sticky ball.
4. Pinch off pieces of the mixture and form into 1-inch balls. Roll in coconut. Place on the baking sheet and chill for about 1 hour until firm.
KATE’S NOTES:
I used two cups equivalent of nuts, utilizing pistachios and pecans as well as almonds. It’s my holy trifecta of nutty favorites. I might have used figs in place of dates, and on another go-round of this recipe, I probably will do just that along with dried cherries. The possibilities are endless for substitutions. Use raisins both black or gold, dried cranberries, currants, pineapple, mango. Other nuts like peanuts, walnuts, brazil nuts. Try it with lemon juice and zest for a different background of flavor.
I also added a teaspoon of ground nutmeg to the mix. Cinnamon and nutmeg are culinary best buds. They really get along so well together that it’s a shame to leave one out when the other is present.
I added a bit more honey and orange juice, as the amount in the recipe didn’t seem to be enough to make the mixture as sticky as it needed to hold together. Adjust it according to your taste preferences.
November 11th, 2009
| 9 Comments »
{{{I’m doing my first guest post over at The LoveFeast Table today! Yeah!}}}
Apple Crisp is so Fall, so perfectly suited for the October-November loop, and so willing to apply anyone’s simple signature to it’s luscious ingredients that it has sort of gone beyond being a favorite dessert, becoming more like that old dear friend that never fails to bring sunshine to a dreary day.

The smell of apples and cinnamon baking is a comfort that threads itself under your skin. It’s no surprise that the most popular of pies and scented candles are usually ‘Apple Pie’, long celebrated as All American and breathing remnants of home and Mom. Apple Crisp is simpler than pie, ready with a few turns of the peeler and knife, chunks of cold butter cut into crumbly flour and brown sugar to bake into a delicately scented crunch atop soft and juicy warm apples.
 
The addition of crystallized ginger in this recipe is wonderful; a gentle hint of warmth and a touch of it’s sweetness made the crunchy topping extra flavorful. I’ve been making Apple Crisp since I was barely old enough to see over the top of our stove, and had to stand on a chair to be able to work the peeler, my Mom by my side watching to make sure I didn’t hack off a snippet of skin here and there. She showed me how to peel an apple whole, with a long dangling strip, and how to carefully carve out apple cores and slice them uniformly so they would bake evenly. Now I have a device that peels and cuts your apples all in the turn of a crank, making any kind of apple dish quick and easy. So when I was faced lately with a chilly night and an unidentifiable need in me to seek a little comfort, a good book and a warm plate of this crisp seemed to be in order. Just taking in the first thin whiffs of the aroma seeping from the oven took the edge off whatever empty spot had formed inside. Apple Crisp was always a prominent item in our Fall kitchen, topped with cold ice cream releasing a thin river of creamy white over the still warm fruit. It’s a memory that tastes like home, if memories come with flavor which almost all of us know that they do. And maybe that night, I needed a memory to soothe me, the feeling of someone by my side watching over me. I know Mom would have loved this version as well.
I’m a nut for almonds – ha! pun intended- but there is little in terms of dessert items that I don’t think can be helped and favored by the addition of chopped almonds. For this recipe, I scattered chopped almonds over the apples in the pan before sprinkling on the topping, and also sifted the fine almond flour from the chopped pieces into the topping mixture to add even more flavor. To do so, just pour the chopped almonds into a wire sieve and shake it over whatever you wish.
Fabulous apple and almond flavor pours through every bite, whether topped with ice cream, whipped cream or yogurt……

Or not……

And yes, I did eat it for breakfast. Wouldn’t you?
Apple Crisp with Crystallized Ginger Topping
adapted from The Art of Simple Food by Alice Waters, via The Heavy Table
Kate’s Advice- Make the topping first. Your apples won’t turn brown that way.
Heat oven to 375°. Butter a 8″square baking dish, or equivalent and set aside.
For the topping:
3/4 c. AP flour
3 T. brown sugar
1 T. white sugar
2 T. crystallized ginger (I chopped mine fine- it would have been WAY chunky otherwise)
1/4 t. salt (omit if you use salted butter)
1/2 t. cinnamon
4 T. butter, cut into chunks
Mix all ingredients except butter in a bowl. Work the butter into the flour mixture with your fingers until it’s relatively chunky. Don’t mix it down to a fine sand. Chill until ready to use.
5 medium apples, peeled, cored and sliced
1 T. white sugar
1 T. AP flour
Toss apples with flour and sugar and place in baking dish. Sprinkle topping over the apples and bake for 30-40 minutes or until filling is bubbly and top is browned.
October 11th, 2009
| 4 Comments »
The words ‘chili’ and ‘simple’ often aren’t used in the same sentence, and I’m sure chili purists would snort at a pot of smoky rich chili that’s ready in less than an hour, but while there can be a steadfast debate over what constitutes true chili- beans, no beans, the type of meat or none at all- chili is one of those subjective words that has as many meanings as there are cooks to pull it together.
I love a pot of chili that develops over time on my stove. The extra deep flavors, the rich tender chunks of beef and the warm smoky aroma that fills my house are one of the things I begin to crave as the daylight grows shorter each Fall. Be that as it may, I also love having something hearty, healthy and quick to pull together and offer to a gnawing stomach. Or a broken soul.
I found this quick chili recipe last year from an Eating Well magazine and it was an instant hit. It comes together so quickly that you might barely have time to bake a pan of cornbread before you are ready to indulge. You need canned beans and enough know-how to chop an onion; most anyone can manage that and yet it just begs for improvisation, for peppers or perhaps corn and some late season zucchini to add heft and health to an already stellar pot.

Soup. Chili. Stew. Chowder. These words have been ringing in my head this past month as we’ve waved off summer and started our reacquaintance with Autumn. Last year I was happily enmeshed in soup-making and found all sorts of good ideas for a steaming pot. This one is a good -and quick- option for soup season.
 
Quick and Easy Three Bean Chili
Adapted by Kate
1 medium red pepper, cored and diced
1 medium poblano pepper, cored and diced
1 jalapeno pepper, cored and diced (for more heat, use serrano)
1 medium onion, diced
3 cloves garlic, minced
1 15-oz can great northern beans
1 15-oz can black beans
1 15-oz can pinto beans
2 15-oz or 1 28-oz can fire roasted tomatoes
3 T. chili powder
1 T. ground cumin
1-2 T. chipotle chili in adobo, if desired
Drain and rinse all canned beans, set aside. In a medium stockpot, cook onion and all the peppers in oil until soft, about 8-10 minutes. Add in chili powder, cumin and garlic and cook about a minute, stirring continually. Add in tomato and all beans, and two quarts of water. Stir to combine and bring to a boil. Simmer to develop flavors, about 15 minutes. Add in chipotle for more flavor and heat if you wish. Season to taste with salt and pepper, if needed.
Can be topped with diced avocado, cilantro leaves and a wedge of lime. Additional ingredients to add if desired: diced zucchini or frozen corn.
August 1st, 2009
| 8 Comments »
Are you a one-track mind kind of person when it comes to your salad? Does it have to be green, with cukes, tomato, a hard crouton or two and some type of dressing or it can’t possibly be a salad?
If that’s the case, then you might want to skip this post.
  
While I certainly have enjoyed my share of salads this summer, resplendent with leafy field greens, dark spinach leaves and all manner of vegetable toppings and extras, I serendipitously came across the be-all to end-all of salad options recently that has thoroughly taken my mind off the standard greens and placed it smack in the middle of Salad Experimentation Land just as the peak of summer produce has me reeling with endless possibilities.
Each of these salads took about 10 minutes to put together, if even that. And every one of them simply shouted with flavor.
 
Lemony Garlic White Beans
1 15-oz can great northern or cannelini beans, rinsed well
2 cloves garlic, thin sliced
2 t. fresh thyme leaves
1 t. crushed red pepper
2-3 T. fresh basil leaves, chopped
Juice of one lemon, zest of half the lemon
1/2 c. grape tomato, halved (more if desired)
Olive oil, salt and pepper
In a medium bowl, combine beans, tomato, lemon zest and basil leaves. In a small skillet, warm olive oil slowly with thyme leaves and crushed pepper. When hot and leaves are sizzling slightly, add garlic slices and cook gently until lightly browned. Stir in lemon juice, then pour over beans and stir carefully to combine. Mash some of the beans slightly and season with salt and pepper. Add more oil if too dry. Chill for an hour or two, then stir before serving. Can be eaten alone, a topping for toasted bread or a filling for an omelet.

Lime Infused Carrots
3-4 medium carrots, scrubbed, peeled and thinly sliced (or grated if you want)
juice and zest of one lime
3-4 T. olive oil
1/2 c. crushed pumpkin seeds (pepitas)
Combine carrots, juice, zest and oil in a bowl. Season with salt and pepper and stir in pepitas. Allow to chill before serving.

Chipotle Corn and Pinto Beans
1 15-oz can pinto beans, rinsed well
3 ears of fresh sweet corn kernels
1 T. chipotle pepper with adobo (more if you like the heat)
1/2 sweet pepper, any color- minced
1 small shallot, minced
Zest and juice of one lime
1/2 c. cilantro, rough chopped
Olive oil, salt and pepper to taste
Combine all ingredients in a bowl and stir well. Season with salt and pepper and chill for about an hour. Taste before serving and adjust seasonings if needed.

This is just a sampling of the 101 salad options I found. The best part of it all is that the suggestions are just baselines for your imagination. That carrot recipe was an off-shoot of the original listed, and the Chipotle Corn salad didn’t have either shallot or sweet pepper in it, but I had them on hand and knew they’d be excellent. The bottom line is simple; the recipes are perfect just the way they are. They’re so easy that cooking skills aren’t even seriously required, but if you’ve got the wherewithal to spark some alternatives, add something with extra pizazz or just take it in a whole new direction, then you could spend now until the coming of winter playing with this list. What are you waiting for? It’s already August!!
November 18th, 2008
| 4 Comments »
It’s National Vichyssoise Day; a chilly November day and we will be honoring cold soup.
Something just isn’t right about this picture. Like Ice Cream Sundae Day, it should be during one of those scorching months of summer where appreciating a cold food is actually a fun prospect, not one to make you shiver.
Vichyssoise- say Vee shee swaz, or Veesh eee swaz– sounds like one of those incredibly complicated dishes that require time and focus, but in truth, it’s a simple potato leek soup that is pureed smooth and served chilled. There is nothing hard about it, nor time consuming. And it’s delicious in either form- hot and chunky (which food snobs would argue that it’s NOT Vichyssoise in that regard but I couldn’t care less about that) or smooth, silky and ice cold. Julia Child’s recipe was so simple that it didn’t even include chicken stock- it was just potato and leek simmered in water and seasoned with salt and pepper. You can’t get much simpler than that.
The origin of the soup is questionable in whether it’s genuinely French or an American creation. Both countries claim to be the first to produce the dish, but the credit is generally given to Louis Diat, a chef at the Ritz-Carlton in New York City. He produced the soup based on a memory of his childhood where his mother and grandmother would make a potato leek soup and his older brother often poured milk into his bowl to cool it off. Diat thought the soup tasted wonderful and in the summer of 1917 he recreated it for the hotel patrons. Diat was French and his hometown in France was Montmarault, not far from the town of Vichy which became the moniker for his creation. The original menu at the Ritz was French, and the soup was named Creme Vichyssoise Glacee, then changed to Cream Vichyssoise Glacee. Other culinarian historians debate that the soup was first made by French chef Jules Gouffe and published in a French cookbook in 1859. Regardless of who can be credited with the invention, Vichyssoise has a reputation for high class finesse despite being little more than peasant food. Anthony Bourdain lists Vichyssoise as a catalyst for his lifelong passion with food; having been served the soup on a trans-atlantic voyage at the age of 9, he recalls falling in love with the “delightfully cool, tasty liquid.”
I really love potato leek soup, and the simplicity of the preparation. For added flavor, you can roast the potato and the leek until golden brown, then add them to simmering chicken stock. I love using Yukon Gold potato for this soup as it gives it such a gorgeous yellow tone, and eaten as a chunky version or blended smooth, it’s a perfect and soothing soup for a cold day as well as a delicious and light chilled soup in the midst of steaming July. The usual garnish is chives or parsley, and a tiny pat of butter in a hot bowl gives it a nice rich decadence. The milk or cream is entirely optional too; the soup is divine just plain. It’s one of those items where more is definitely not better.

April 21st, 2008
| 4 Comments »
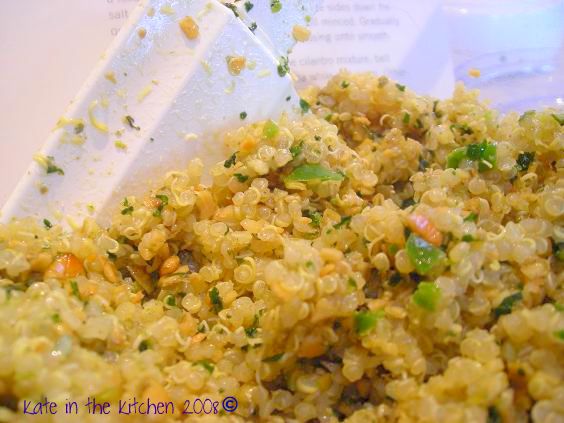
Mexican Quinoa with Pepitas and Cilantro
from The New Whole Grains Cookbook by Robin Asbell
1 1/2 c. water
1 c. quinoa
1/2 c. raw pumpkin seeds
1 c. washed cilantro leaves
2 cloves garlic
1 jalapeno chile
1/2 t. salt
1 t. ground cumin
2 T. olive oil
1 t. lime juice
1 small red bell pepper, chopped
2 scallions, chopped
Bring water to a boil in 2-qt saucepan with tight fitting lid. In medium bowl, wash quinoa well, rinsing with warm water. Pour off most of the water and drain in a fine-mesh strainer. When the water boils, add the quinoa, bring to a boil and the reduce heat to simmer, cover and cook for 15 minutes. The water should be absorbed and small holes will have formed on the top. Let stand, covered for 5 minutes.
In a large skillet, dry-toast pumpkin seeds, shaking pan until they begin to pop. Remove from heat and place in food processor or blender. Add cilantro, garlic, jalapeno, salt, and cumin and process, scraping sides occasionally, until all ingredients are well minced. Gradually add in oil and lime juice and process until smooth. Stir into cilantro, mixing well. Can be served warm, or chilled.
KATE’S NOTES: I followed the recipe faithfully. The only thing I did different was to use roasted and salted pepitas (the seeds) as the store I went to did not carry raw ones. The flavor, at least in my opinion, was highly enhanced by the roasted seeds, which I toasted as per the recipe. You would need to cut back a little on the salt if using a salted seed. I also added lime zest to the sauce. You just can’t lose with that addition.
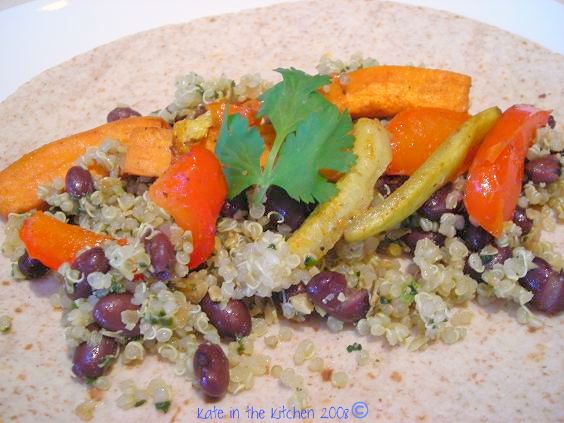
Roasted Vegetable Wrap
Cut one sweet potato/yam, one red pepper and two small zucchini into 2-inch strips. Toss with olive oil, salt, pepper and place on baking sheet. Roast in 400 degree oven for 20 minutes; stir and roast until tender.
Stir one cup of drained and rinsed black beans into Mexican Quinoa. Layer quinoa/beans and vegetables on a whole wheat or multi grain wrap and fold over. Cheese is optional, enjoyment is paramount.
September 13th, 2007
| 7 Comments »
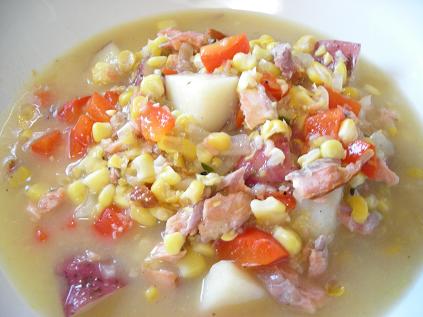

Smoked Salmon Corn Chowder
from ‘The 12 Best Foods Cookbook’ by Dana Jacobi
4 small red potatoes, scrubbed and diced
1 T. canola oil
1 small red onion (or two shallots) peeled and minced
2 cloves fresh garlic, minced
1 green (or red) pepper, cored and diced
1 14-oz can creamed corn
1/2 c. frozen corn kernels (i used corn cut from two fresh cobs)
1 c. fat free lo-sodium chicken broth (i used way more, like almost a quart)
2 t. fresh thyme leaves, minced; or 1/2 t. dried thyme
Pinch cayenne pepper
4 oz smoked salmon, flaked
Salt and pepper
Place potato in medium saucepan and bring to boil; simmer until just fork tender. Drain, and set potato aside. In stockpot, heat oil, then saute onion until tender. Add garlic and cook 30 seconds or until fragrant, then add pepper and cook until crisp tender (or to taste- you may like it softer). Add in creamed corn, corn kernels, thyme, broth and cayenne and bring to a boil. Add in potato and cook for 5 minutes. Turn off heat, stir in salmon, season with S&P and serve.
Roasted Red Pepper Butter
1 c. room temp butter
7-oz jar roasted red pepper, drained and finely minced
2 t. milk
1 T. fresh chives, minced
1 T. fresh parsley, minced
1/4. c. fresh grated parmesan or asiago cheese
Salt and Pepper
Combine all ingredients in a small bowl and beat with a hand mixer until smooth and fluffy. Can be shaped into a log and chilled, or stored in a plastic container.
Hint: with the peppers, the finer you mince, the prettier and more spreadable the butter will be. I used a knife on mine but next time will use a food processor or chopper to get them even finer.
|

