January 8th, 2014
| 2 Comments »
We’re on the upswing of some pretty intensely cold weather. Thankfully it was brief, only a few days, but the deep freeze shut down the state in ways that I haven’t seen in almost 20 years.
I’m old enough to well recall the last two deep freeze spells that came through Minnesota; the last one, in 1996 caught me inside a superbly drafty, old house and my poor baby, barely even 2 years old, was wrapped up so tight in layers that he could barely toddle around. We spent a lot of time snuggled in blankets watching PBS and reading books. And prior to that, in 1994, I was carrying him around on my insides, and so toasty warm with extra weight and hormones that I walked to the bus stop in -20 temperatures, with a cruel wind to boot, in an open winter coat that flapped in that vicious breeze. And I was still too warm. I didn’t get any frostbite, but I sure got some weird looks.
And here’s the thing; yes, by golly, it’s cold. But that just means more layers, more awareness when going out. I was outside on both of our recent cold days and although I could certainly vouch for the bone-chilling wind, I was dressed properly and felt just fine. Not fine enough for being out very long, taking a walk or getting out the nordic skis, but there was no fear in running errands and going about my business. Working in a grocery store led me to witness some pretty bizarre behaviors in people buying up supplies like an apocalypse was upon us, but quite frankly, I’m more fearful of being out in a blizzard than I am of dealing with a polar vortex. Cold is not so bad if you aren’t afraid of it.
We did have a big hiccup with Mike’s car, though, as he willingly allowed Griffin to park his car in our garage overnight so that when he had to leave for work at 4:30am, his car might start a bit easier. Which it did. But, as you can imagine, Mike’s car wouldn’t start after being out overnight in -50 wind chills. After multiple attempts to get the engine running, he disconnected the battery and brought it inside to warm up, keeping it connected to an electric charger. The next morning, the car roared to life as it should. Bottom line: if your car has to be outside, try taking the battery inside on those brutal nights. It’s a little extra work that might save you from a dead vehicle. And an electric charger should be in everyone’s arsenal.
Our fireplace got a lot of use over the past week, too. It’s gas, which isn’t our favorite, but you can’t beat it for ease and for incredible warmth. The fireplace has a blower that sends the warm, heated air out in to the room, and I curl up on the sofa in front of it, cats draped across my lap, my knitting in hand and a movie or TV show on Netflix and can pretty much forget that’s it’s not a fit night for anyone outside our windows.

At the top of every coping mechanism, however, is the food we love to consume when the weather bottoms out. You all know that I love soup, almost beyond words, and for one of our bitterly cold night, I made a simple pot of simmered beet greens, chickpeas and red-skinned potatoes from our Fall Storage CSA share. Simmered in turmeric-laced coconut milk, spiked with red curry paste, it was enough to cut through even the most bone-rattling cold, warming us right to our toes. Beet greens {and all hearty greens, like kale, mustard greens, collard greens, and chard) become silky smooth, nearly melting in your mouth when simmered slowly, and this method has made me a huge fan of just about any dark, leafy green, loaded with the iron our bodies need. This soup is pretty similar to my popular Braised Kale & Chickpeas recipe, with a few tweaks here and there. The addition of turmeric adds lovely color, and the wonderful anti-inflammatory properties that turmeric offers.
We’re expected to warm up in to the low 30’s by the weekend, and I can’t even imagine how delightful that’s going to feel after this last blast of arctic air, but, sadly, weather patterns hint at the brutal cold returning all too soon. There’s lots of Winter left. Plenty of soup to be made, I imagine.
Greens, Potatoes & Chickpeas in Coconut Milk
1 large bunch dark, leafy greens such as Beet, Collard, Chard or Kale, washed, de-stemmed & rough chopped
1/2# red-skinned potatoes, scrubbed and cut to 1/2″ {leave the peels on}
2 c. cooked chickpeas {equal to 1 15-oz can, rinsed well}
1 15-oz can coconut milk {use full fat for best flavor}
1 c. water
2 T. ground turmeric
2 T. red curry paste {optional, but you’ll love how it warms you from the inside}
1 large shallot, minced
3 cloves garlic, minced {use less, or more, to taste}
In a deep skillet, warm oil of choice and sauté the shallot and garlic with a big pinch of salt until softened, about 5 minutes.
Add in the greens by the handful, stirring to help them wilt slightly. When all the greens are added, pour in the coconut milk and water, and stir to combine. You won’t have a ton of broth, and you don’t need a lot. Add the curry paste and whisk to incorporate, then sprinkle the turmeric over everything and stir until combined. Bring to a simmer, add the potatoes and chickpeas, then cover and cook over low heat until the potatoes are just fork tender, stirring occasionally. Don’t cook them to the point of falling apart. The greens should be silky smooth.
Season to your taste with salt and pepper, then ladle in to bowls.
December 31st, 2013
| Comments Off on cold weather coping, with Vegetable Shepherds Pie
There’s no shortage of weather folklore to be found, in which the rhythm of the seasons can be a harbinger for predicting coming temperatures. This one seemed particularly fitting to our current weather in Minnesota.
When leaves fall early, Fall and Winter will be mild;
When leaves fall late, Winter will be severe.
Our whole theater of seasons in Minnesota was far, far behind the norm this year, with snow falling on May 1st, the growing season extended to near the end of October, and Autumn leaves peaking weeks behind schedule. Is it all an indication that our Winter will continue to be caught in a deep freeze? Stick around.
Decembers as of late have been all across the board for weather; we’ve had monster blizzards (December ’10) that dumped nearly 2-1/2 feet of snow on us, and Christmas weeks that have had nothing but hard rain (December ’12).
This December, it’s been the season of sub-zero temperatures.
It’s a languid post-Christmas week (languid for me as I took 9 days off after Christmas), and we’re already experiencing a second round of deep cold and unpleasant wind chills, of complaining and groaning over why one lives in such a place, running through Instagram photos of island vacations past, to dream of warm sand and sunshine and forget that exposed skin could acquire frostbite in just 10 minutes exposure outside. We bake to ward off the chill, simmer kettles of soup or slowly braise a comforting pot, cuddle under blankets, binge-watch Netflix and Hulu or movie catalogs, or just plain deal with it when the temperatures plummet and the wind bites with gnashing teeth at our skin. But one thing remains; we’re all in this together.
Cold weather isn’t much of an issue with me. I’ll add another layer, pull out the thick, warm wool mittens, tug on some leg warmers and keep my head down from the wind. Inside, I slip on wooly hand warmers, sheepskin slippers and invite the cats for a snuggle. Cranking up the oven helps too, as adding warm, cozy foods to the menu is the best way to keep warm from the inside.

This Vegetable Shepherd’s Pie was created as a vegetarian entree I was designated to bring for a Christmas gathering with my in-laws. I wanted something that would be universally accepted across the board by all the various dietary needs of our extended family; the Primal eaters, the wheat-free, the dairy-free and the meatless. It covers all those bases with it’s lush pile of heavenly roasted vegetables bathed in a balsamic glaze and a simple shower of salt and pepper. I chose not to use a binder to hold it all together, and instead of rich, buttery potatoes coating the top, I used roasted sweet potatoes, spun to a silken mass with a hand-mixer, touched only with good seasonings. The result was remarkable in flavor, eye-catching in presentation. I was thankful that it was so well-received, and grateful to have still a large portion to bring home and consume, post Christmas, as the deep cold set in.

Don’t be put off by the long recipe; you roast most of the vegetables, which can be accomplished while the sweet potatoes and beets do their thing in a hot oven. You’ll spend some time prepping those veggies, but putting it all together happens quickly. You can make the recipe in two 8×8 pans, saving one in the freezer for another time. Another elegant presentation would be to portion out ramekins for individual servings, an ultimate dinner party delight. The recipe makes plenty of filling to do with as your creativity leads you.
Best of all, when the temperatures drop and your belly growls it’s hunger at you, this feeds you with warmth, good health and well-being. For the upcoming winter, you’ll love having this in your repertoire.
Vegetable Shepherd’s Pie
3 Parsnips, peeled, cut to 1/2” chunks
4 medium carrots, peeled, cut to 1/2” chunks
2 stalks celery, cut to 1/2” pieces
2 8-oz pkgs whole baby portabella mushrooms, quartered
1 medium onion, halved, sliced thin
4 cloves garlic, peeled and rough chopped
3 cups Brussels Sprouts, trimmed and halved
4 small to medium gold beets (from one bunch) scrubbed, greens removed if needed
5 medium sweet potatoes, scrubbed well
1/3 c. mixed fresh herbs, minced (oregano, parsley and thyme are delicious)
olive oil
salt and pepper
balsamic vinegar
Heat oven to 400 degrees. You will be roasting all of the vegetables except for the celery, onion, mushroom and garlic. They will all take different amounts of time to finish, so start with the ones that will take the longest: poke the sweet potatoes a few times with a sharp knife and place on a foil lined baking sheet. Wrap beets well in foil. Place both in hot oven and roast until tender. A fork should slip easily in to the beets when they are done. Set aside to cool.
In a bowl, toss parsnips with a bit of olive oil and salt and scrape onto one side of a baking sheet. Repeat with carrots, and place on the other side of the baking sheet. Roast in hot oven until just tender. Place back in bowl and set aside. Repeat with Brussels sprouts, roasting until just tender. Scrape from pan in to bowl with parsnips and carrots.
Meanwhile, in a large, deep skillet, warm 2 tablespoons of olive oil and 2 tablespoons butter. When bubbling, add mushrooms, and sauté over medium-high heat, stirring regularly, until they release their liquid. Add onion and celery and continue to cook, stirring often, until they soften, about 5 minutes. Reduce heat slightly, and cook for about 10 minutes, allowing the mushrooms to brown in spots and become very fragrant. Stir in garlic and sauté for about a minute, then add about 1/3 cup of balsamic vinegar. Scrape up any browned bits in the skillet, and simmer until the vinegar is absorbed. Add in the parsnips, carrots, and brussels sprouts and 1/4 cup balsamic vinegar. Stir to combine and allow to simmer over low heat for a few minutes. Turn off the heat. Peel the beets, chop in to bite sized pieces and stir in to vegetable mix with the fresh herbs. Scrape entire pan in to a 9×13 baking dish.
Peel sweet potatoes and place in a bowl. Mash with a fork, or potato masher until smooth and creamy, season with salt and pepper. Spread evenly over vegetables. Place back in the oven for 15-20 minutes to heat through.
June 19th, 2012
| 5 Comments »
I’ve been on a mostly plant-based eating plan for just over a year now and have no intention of ever going back to eating meat on a regular basis. I’m not against having a bit of it here and there if the mood suits me, but with a heightened awareness of how it deeply affected my health, I’m off of the stuff for the long term.
Trouble is, I’ve been searching for cooking inspiration and while I can find a great deal online in the blogs that I follow, I hadn’t come across a really good source until I serendipitously found Michael Natkin’s blog, Herbivoracious, and within a day’s time was invited to a local book signing with the author. Everyone who attended the event received a complimentary cookbook and several tantalizing bites from the simple and gorgeous recipes in the book.

I haven’t devoured a cookbook like this in a very long time. I’ve purchased a few promising vegetarian cookbooks through used book stores, but have come away from them feeling uninspired, or worse, dismayed at the boring recipes. In our current state of food, with a wealth of ingredients available to us, fresh produce everywhere and home cooks hitting up the internet with abandon to share their stories and recipes, we shouldn’t feel like pasta and vegetables make up the bulk of a vegetarians meals, but that was the message a lot of vegetarian cookbooks still seem to send. I wanted something that reflected the modern cuisine, full of a wide selection of fresh ingredients, unique spices, terrific grains and a grown-up mentality towards consumption of plant-based foods. Just a few pages in to Michael’s book and I knew I’d found what I was looking for, breathing an excited sigh of relief. I immediately started marking pages, rich with inspiration, my mouth already watering over what was to come.
One aspect of this book that I love is that it mirrors my own cooking philosophy, in that a recipe should be a guide, and not a cut and dried interpretation of the finished dish. Michael clearly discusses ways to change up his recipes, suggesting additional ingredients or substitutions and encouraging the reader to utilize what’s on hand. Every dish is simple, yet elegant, running the whole range of time needed for completing the recipes from about 10 minutes to pull together an easy salad to longer, in-depth recipes for those special occasions. The book is full of advice on sourcing ingredients, caring for your knives, planning your meals and making your prep easier to manage; he covers so many little details that it makes the book more than just a cookbook, but something akin to treasured kitchen advice. The cover page is gorgeous, but if it gets torn, stained or otherwise in your exploration, the actual cover itself still has it’s beautiful logo. I like that in a book.
Even while still at the book signing event, chatting excitedly with a few friends and paging through the book, I came across the Golden Beet Tartare recipe and knew that would be tops on my list. I adore gold beets and it sounded like a delicious summery salad for a hot, sticky day.
I wasn’t wrong at all about that. The heat is on, Minnesota. It’s time to stay cool, right?

Fresh and bright, this simple salad has crunch and texture galore, the rich earthy taste of beets and mellow cucumber and onion. The original recipe called for raw red onion which I don’t ever use as I dislike raw allium in anything, so I substituted grilled vidalia onions with just enough snap remaining. Once it was all pulled together I thought it still needed a bit more color to jazz up the visual aspect, so I finely chopped some kale leaves that gave it the perfect balance.

I can foresee this recipe becoming a regular in my kitchen, giving it repeated appearances and endangering my endless love of beets. With the upcoming beet season looming, and such pretty colors and patterns in this nutritious and healthy root vegetable, I vow to practice enough restraint to keep it fresh and desirable so we can continue to enjoy it’s benefits. Right now, I’m fighting off the urge to consume the entire container of this salad. A definite winner.
Please visit Michael’s site, for his complete recipe for Golden Beet Tartare. I’m going to give you my method, which, as Michael encourages, is my own take on the recipe.
Golden Beet Salad
3 medium beets, tops trimmed (save them and eat them if it’s your thing)
1/2 an English Cucumber, peeled and finely diced
1/2 medium Vidalia onion, grilled but still somewhat crunchy, finely diced
1 T. capers, drained and minced
1/2 c. kale leaves, finely minced
3 T. olive oil
1 t. fresh lemon zest
1 T. fresh squeezed lemon juice
1 T. fresh chives, minced
2 T. fresh parsley, minced (I used flat leaf; curly would work just as well)
Sea salt and fresh ground black pepper
Heat oven to 400°. Place a square of foil in an 8×8 baking pan and put beets in the foil. Drizzle with a bit of olive oil and fold the foil over the beets. Roast the beets until a knife inserted in them slips out easily. The time will depend on the size of your beets, but plan for at least 45 minutes to an hour. Allow the beets to cool, then peel and dice them.
In a bowl, add the beets, cucumber, onion, capers, kale, lemon zest and juice, chives and parsley. Drizzle in the oil, add a few shakes of sea salt and grinds of pepper. Stir to combine and taste for seasoning. Allowing the salad to sit for a few hours, or overnight before serving will deepen the flavors. Adjust seasonings before serving.
DISCLAIMER:
I received a complimentary copy of Herbivoracious from attending the book signing event.
All opinions and feedback about the book are strictly my own.
April 11th, 2012
| 1 Comment »
There’s nothing, really, to making a pan of enchiladas. Tortillas, filling, sauce and cheese, a bit of time in a hot oven and you’ve got a dinner that should please just about anyone. I probably don’t even need to give you a recipe, do I? (but I will…..)

What enchiladas are though, is reliable. At least in my home they are. I know they’re something that all of us will eat without a shred of complaining. And we all need those types of meals in our homes, on our tables and in our back pockets, don’t we? The ones that no one whines over, or rolls their eyes. A meal that everyone will gobble down with reckless abandon. I know with a few peppers, canned beans, frozen corn, a pack of tortillas and a bit of time, that a meal will land in our midst and pull us together, drawing the day to a close. And long before we stopped eating meat, I could make Vegetable Enchiladas and Griffin wouldn’t care one whit about them. Thankfully, that’s still true.
We’ve slipped back to somewhat more normal weather these days, now that April has come and set her softly budding Spring on us. March’s heat wave gave us all a taste of warmth and summer and we all want it back, but these days, the nights come cold and brisk and for me, this past week of frost warnings and cold sunshine was enough to want the oven humming and a warming dish in our bellies. I know soon enough that it won’t feel like these comforting dishes will be necessary, so along with our old reliable Enchiladas, I wanted to have one last send off of a favorite meal before the heat comes and dinner plates are full of fresh and lighter meals.

There’s really two ways you can make Enchiladas, outside of choosing between corn and flour tortillas; you can roll up the filling inside the tortillas, or you can layer the filling between the tortillas, creating a more ‘lasagna’ style dish that’s equally as good, and sometimes a bit easier to negotiate out of the pan. I like them both ways, and the ‘lasagna’ method is a bit less work, but if you’ve got willing hands to help, the rolling part happens pretty fast. The best part of this meal is having LOTS of good leftovers, and I think the flavor gets much better overnight.
And as for sauces….. I’ve never made an enchilada sauce from scratch that even came close to tasting like a few canned varieties I’ve found. My go-to brand of enchilada sauce is Carlita; it’s a deep, rich red sauce that’s got just the right amount of seasoning and spice. Las Palmas is another good option; they’ve got both red and green enchilada sauce, and have a Mild, Medium or Hot option. The Medium is plenty for us, and their green enchilada sauce is really amazing.
(disclaimer: nobody paid me to say that, or gave me free products to say that. Just so you know)
Vegetable Enchiladas
2 bell peppers, cored, seeded and diced (any color you choose)
1 large yellow onion, diced
2 cloves garlic, minced
1 jalapeno pepper, cored, seeded and diced (like it spicier? make it a serrano)
2 small zucchini, peeled and diced
1 c. frozen corn kernels
1 15-oz can black beans, drained and rinsed (can sub any kind, really)
1 15-oz can fire roasted tomatoes
1 T. chili powder (can sub in canned chipotle in adobo if you have it on hand- it’s a wonderful flavor)
1 T. ground cumin
2 c. washed and finely chopped spinach, chard or beet greens (optional, but it adds a good amount of flavor and nutrition)
8-oz shred cheese of choice
1 15-oz can enchilada sauce of choice (you can use two if you like a lot of sauce)
Tortillas of choice (use the small 6″ corn, or the 8″ flour; you’ll need 12-15 corn, 10-12 flour)
Oil of choice for cooking
Spray a 9×13 baking pan with cooking spray. You may have enough filling to make more enchiladas, so have a smaller pan at the ready, like an 8×8. Heat the oven to 400°. Have your tortillas on the counter to warm slightly as they’ll roll better, but if you’re using corn tortillas, don’t leave them uncovered or they will dry out.
In a deep skillet with a cover, heat a bit of oil and add the onion. Cook about 10 minutes, or until softened and then add the bell pepper and jalapeno. Cook, stirring occasionally until the peppers begin to soften. Add in the garlic, zucchini, frozen corn and canned beans. Stir it all together and get it simmering. Cover the pan and cook for about 10 minutes. Stir in the greens, cover and turn off the heat. Let stand for about five minutes.
Place a tortilla in the pan and drop a few tablespoons of shred cheese down the middle. Spoon some of the filling in (the amount depends on the size of your tortilla) and spread it to the edge. Gently roll the tortillas up, making sure the seam side is down. Repeat until the pan is full. The tortillas can be moved closer to one another as your roll. You want them pretty snug, but not crammed in the pan or it will be impossible to get them out.
Spoon the sauce down each tortilla, spreading it out as you go. They should be well covered. Sprinkle the top with cheese and cover with foil. Bake for about 20 minutes, then take the foil off and allow the cheese to brown just a bit more. Thirty minutes should be plenty of time. If you allow the Enchiladas to sit for 10-15 minutes, they are A LOT easier to get out of the pan.
These are delicious served with avocado, sour cream, or both.
KATE’S NOTES: To make Enchiladas ‘Lasagna’ style, lay the tortillas on the bottom of the baking pan. Spread some filling over them, then top with a bit of cheese and a drizzle of sauce. Layer more tortillas and repeat. You should be able to get at least three layers, finishing with sauce over the top, and cheese before baking. Allow this to also sit for a spell before cutting in to squares.
If you wish to add meat to the filling, please do so. I used to make these all the time with chicken, and once in a while with pork or beef. One pack of boneless skinless chicken breasts is perfect; dice them, and sear the meat in with the onions, then proceed with the remaining steps.
Any leftover filling is wonderful for breakfast. I had about 1-1/2 cups left from this meal, and for breakfast I heated it in a pan then cracked two eggs in it, covered the pan and cooked it for about five minutes. I scooped it on to a plate that had a handful of tortilla chips on it. It was the finest breakfast I’ve had in a long time.
March 31st, 2012
| 3 Comments »
When I was 15 or 16, my Mom broke her left elbow roller skating. Outside of the fact that my MOM -gasp!- was roller skating (and apparently getting rather cocky about it) she happened to be left-handed, and in breaking her elbow, this rendered her incapable of doing much of anything. She lamented one day, as I helped her in the kitchen, “I wish I had learned to use my right arm more.” and somehow this struck a chord with me, as did her inability to manage even the most mundane of daily tasks.
It’s been in the back of my mind since then to train my hands to work equally. Although my left handed writing looks like an overly caffeinated six year old, and my knife skills in my left hand are nothing compared to my right, I can whisk, scoop, stir, twist, grind, mix and pour from either right or left. I can reach and function and do just about anything needed during the course of my day without having to switch gears, hands or mindset.
There is always more that your body can do, when allowed. If you’ve learned how to type on a standard keyboard, then you can teach your non-dominant hand to do any number of things. Even though one side of our brain dominates, and we develop a set of skills with that dominant hand, there is far more that one is capable of if you’re willing to put your mind to it.
That goes for recipe usage too. Recipes are not cut in stone; they should serve as a guideline, a base from which we can expand exponentially in many different directions. I love recipes because someone else has already done most of the work for me, but I am free to remove this and substitute that, increase this or decrease that or look at how it comes out in one form and think “I know this can be better.” and then trust that my skills can take me there. These skills have been especially useful in the re-development of this incredible Red Rice Pulao.

The origin of this recipe comes from Robin Asbell‘s New Whole Grains Cookbook, which, in a soft yet grand way simply changed my life in 2008. Long before the intense embrace by food lovers of all things whole grain, I’d run through a bookful of recipes using quinoa, millet, bulgur and various rices, finding great things to love about these simple staples. Grains are one of the easiest foods to work with in any kitchen, and require no special treatment. Particularly fond of the vibrant rices available, this Red Rice Pulao made for an chewy and delicious experience, and like many wonderful recipes on this blog, I simply posted it once and never went back. What a mistake.

Because that means no one’s ever going to see it, as really, does anyone look in to the archives of a food blog? Rarely. And I loved the recipe when followed to a ‘T’. As I thought about it again, with more capability to be flexible in my cooking, I decided a second go of this dish was in order and am I ever glad I stepped up and made a few changes because this 2.0 version is light years better than the original. No offense to Robin, but the very task of cooking is to learn to feed oneself in the manner that makes you happiest. No cookbook author outside of us knows what makes us happy; only we do, and we owe it to ourselves to learn just enough kitchen skills to take the humblest of foods, such as rice and vegetables, and make them extraordinary. Let the recipe author be your guide, but let your imagination, your tastes and your skills drive you to cook with instinct instead of blind faith.


Task-wise, this has a few moments of chopping and prep, but largely you are passing a great deal of idle time as rice simmers, and vegetables roast, while heady fragrances take over your home. This isn’t high-tech stuff here; with the heat of an oven and the magic alchemy of boiling water with rice, you can make an exceptional dish that tastes far more grand than it’s humble beginnings. If you’re unfamiliar with red rice, it’s an intensely chewy rice, often found labeled as Himalayan Red Rice, or Wehani. Properly cooked, it takes up to an hour, all hands off. Finished, it’s a really hearty and satisfying grain, deeper in flavor than brown rice, not as earthy as wild rice. This dish is easily a main course, or can be eaten as a side with any number of proteins. I can vouch that it’s especially good with grilled pork tenderloin.
Here’s where you get to decide what you do with this recipe, because if you want, outside of making the rice you can experiment wildly, with everything else. Instead of carrots and cauliflower, add whatever vegetables you have on hand, or swap almonds, walnuts, pecans or peanuts for the pistachios. This is your base, and when you read through it, your tastes will direct you, just as they should. Trust those instincts. And enjoy.
Red Rice Pulao with Roasted Vegetables
1 T. oil of choice
1 T. chopped ginger
1 T. brown mustard seeds
1 shallot, finely chopped
1/2 t. chili powder
1 t. ground turmeric
1 c. red rice or brown basmati rice
2 c. water
1 T. brown sugar
1 t. salt
2 T. lemon juice
1 head of cauliflower, cut to bite sized pieces
2 medium carrots, sliced
1/2 c. shelled pistachios or toasted slivered almonds
In a 2-qt saucepan, heat oil briefly and add ginger, mustard seed and shallot. Cook for a few minutes, until the ginger is fragrant and the seeds are popping slightly, then add chili powder and turmeric. Stir it up well and cook for a few seconds until the smell is amazing. Add rice, water, brown sugar and salt, stir it up good to combine it all and bring to a boil. Cover tightly, reduce heat to low. The amount of time needed to cook the rice will depend on what rice you use. Test the grains after the time specified on the package, and adjust to your personal taste. Allow to cool slightly. If you are using a true red rice, be patient with it. The time required for me to make mine was slightly over an hour. And every minute was well worth it.
While the rice cooks, heat the oven to 400°, and toss the vegetables with a bit of oil and salt. Since these two cook differently, I put the cauliflower on one pan, the carrots on another and roast until each are tender, shaking the pan often, and stirring to insure even browning. They can hang out in their finished state, until the rice is done.
If you love a good deep flavor for pistachios, take a few minutes and toast them in a skillet over medium heat. It’s well worth it, and that rice gives you plenty of time.
When the rice is done and cooled, dump it all in a large bowl and add the roasted vegetables. Toss together gently and add a few tablespoons of those nicely toasted pistachios. Toss a bit more, taste and add salt and pepper if you wish, then serve it, topped with more pistachios. This dish is good whether served cold, hot or at room temperature. You can garnish it with chopped scallions too, for a bit more flavor.
January 5th, 2012
| 4 Comments »
The new year is starting out with a bit less motivation than I was expecting. This isn’t such a bad thing; I did have the last five days off work, and after the busy, frenetic pace of the holidays that was a very welcome change. Maybe the sloth that settled on me was just a reminder to take the time off wisely, to relax, regenerate and just be.
But I wanted to cook and I wanted to stretch. I’ve been lacking in the desire to stretch in the kitchen, to experiment with a few recipes that press against the norm of what I’ve been doing lately, which admittedly, isn’t a whole lot. That work thing sort of stunted my creativity for a while, and before that…. well, I was just coasting. But we’re on a fresh calendar page, with new beginnings for everyone; resolves to take a healthier approach to life, to strive for better in our personal lives; I’ve even seen people who are eager to expand their eating repertoire, promising to try one new food item each week. These are resolves I can get behind. And along with continuing on our meat-free journey, I need to explore more options for our meals. Because while soups, meatless chili and braised greens are all tremendous and satisfying, there is so much more in this vegetable world that can be taken on.

This recipe was bookmarked back in October, most likely. As is the norm, I’m just not sure why I don’t tackle these things as soon as they land in my radar. I could have been enjoying this dish on repeat each week, changing up the vegetables and inhaling it’s deeply dark and sweet flavor through these last few months, but as usual, it languished. And we missed out. That’s too bad. The flavor in this dish was incredible, invading our senses not only as it cooked, but as we gathered over our steaming bowls, forks poised in anticipation. I looked down at my bowl and turned to Mike. “This is a total restaurant dish.” and he nodded as the first bite crossed his lips. His eyes lit up and he smiled.
And there’s another reason why I kick myself for waiting so long to enjoy this. To miss out on seeing that is criminal.


The creation of this dish isn’t difficult; it does require some attention as you methodically caramelize your vegetables in stages on the stovetop. I evolved the process from the original instructions to make it even easier for your average cook. You need a big pan with lots of surface area- I used a 12″ skillet with straight sides- and patience to allow the vegetables to cook, undisturbed, so they achieve that golden flavor and color. The original recipe calls for using orzo, but I’m slightly enamored of pearl couscous these days, so any excuse to throw that in the mix is fine with me. A good hearty brown rice would even work. While there are a lot of steps to this recipe, it flows very well so don’t let the length intimidate you.
Don’t you just love that color? Not only is the dish gorgeous all on it’s own, placing it in the morning sun, as it rose behind a thin band of clouds brought out all it’s burnished caramel-y tones. Even with it being 9:00am when I took these photos, I could have eaten this for breakfast without a second thought. Hmmmm….. don’t mind if I do.
Caramelized Vegetables with Pearl Couscous
Salt
2 c. pearl couscous
Grapeseed, peanut, or vegetable oil
1 large sweet potato (about 3/4 pound), peeled and diced, about 1/4″-1/2″
1 large onion (about 1 pound), finely diced
4 cloves garlic, minced
3-inch piece fresh ginger — peeled and chopped fine, about 1 tablespoon
1-8oz pkg portabella mushrooms, sliced, with stems removed
1 T. balsamic vinegar
2 T. soy sauce
3 big leaves chard or kale, stalks removed and leaves finely chopped — about 2 cups (I subbed in the equivalent of arugula)
Freshly ground black pepper
Parmesan, optional
Heat a large pot of water to boiling and salt it generously. Cook the couscous until barely al dente — about 5 minutes. Drain and toss with a generous drizzle of oil so that the grains are lightly coated with oil. Set aside.
Heat a large sauté or frying pan (the largest you have — you want plenty of room and hot surface) over high heat. Drizzle in a little grapeseed or vegetable oil (not olive oil — you want an oil with a high smoke point) and heat until very hot. Add the sweet potatoes and arrange them in one layer. Cook them over high heat until they are beginning to caramelize and turn brown — about 4 minutes. Flip them over and cook for another 3 minutes or so.
Turn the heat down to medium and add the onions, sprinkling them with about a teaspoon of salt. Cook, stirring occasionally, until the onions are beginning to turn brown. Add the minced garlic and chopped ginger and stir them into the onions. Push the sweet potato and onions to the edges of the pan, making room in the center.
Add the sliced portabella mushrooms to the hot center of the pan and cook them for 4 minutes without turning them. Then flip and stir them and cook for another 4 minutes. Once browned, stir them in to the sweet potato and onions. Keep the heat at medium, or slightly higher. Stir the vegetables occasionally. You want them richly browned.
At this point everything should be getting well-cooked; the onions should be quite dark brown and the garlic should be golden and soft. The potatoes should be softening.
Whisk together the vinegar, soy sauce, and 2 tablespoons of oil. Pour this into the pan with the vegetables and mix everything together, scraping the bottom as you go. Cook all the elements together for about 3 minutes on medium heat. Then turn the heat up to high, as high as it will go.
Add the couscous gradually, shaking in about a cup at a time, stirring and scraping constantly. Cook the couscous over high heat with the rest of the vegetables for about 5 minutes, letting the couscous get browned on the bottom of the pan, then scraping it up. You are developing a little more color and flavor on the pasta, and helping all the flavors combine. (I cooked this a bit longer to get more flavor in the couscous. The browning of it smells glorious)
Finally, toss the greens into the mix and cook for 1 more minute or until the greens are barely wilted. Turn off the heat and taste. Add salt and pepper if needed. Serve hot, with shavings of Parmesan if desired. (We didn’t even consider the parmesan. And I don’t think it even needed it.)
Original recipe from The Kitchn, by Faith Durand. Here with my own modifications.
October 17th, 2011
| 6 Comments »
I spent a significant amount of time this past summer wandering up and down the aisles of our local farmers markets, as many, many people do. But I don’t venture in to the larger markets in Minneapolis or St Paul, instead preferring to go to the small satellite ones in the suburbs. I can always find what I needed, and as was the case this past year, I found a whole lot more than I ever anticipated.
Each summer for the last 5 years it seems some type of theme arises from a particular food I discover and experiment with; it might be a food type, such as the summer of 2007 when I learned a great deal about cooking with whole grains like quinoa, millet, bulgur and a multitude of colorful rice varieties. Or it might be a particular food, like in 2008 when I took the humble burger in different directions, and 2009 found me falling in love with beets and getting my fill of learning about those. In 2010, what I experimented with was a killer job. Cooking went by the wayside last year, but this summer, with a better schedule and actual time off during the week, trips to the Farmers Market were a must, and in those weekly visits, I came across a multitude of vegetables that I’d never tried or even considered prior to this past June.
And what was different about this year was the increase in the need for vegetable based meals, since we walked away from meat consumption in May and never looked back. So stretching the imagination and reaching for foods that were unfamiliar was going to have to stick. I needed to expand my palate, and this was the perfect spot to do so.
If I could pinpoint one item that I really learned a great deal about this year it would be Greens. Kale and chard crossed our plates and made appearances in our kitchen nearly every week. Enormous bunches of chard could be purchased from the market for a dollar a piece and easily could feed us for 2 meals or more, depending on what I did with it. I discovered the joys of making Chard Chips, and fell in love with a simple chard side dish, sauteed with a few cloves of garlic and simmered gently to bring out it’s deeply rich and slightly sweet flavor. I love Rainbow Chard for it’s colorful stems.

Then, in one visit to the market in Maplewood, I came across a giant bunch of greens on a farmers table and asked curiously “What is this?”
“That’s Sweet Potato Leaves.” She said, smiling widely. “They’re like spinach, only a little sweeter.”

Here was yet another enormous bunch of greens, and for a dollar as well. What did I have to lose? I handed over a buck and placed the bunch in my sack and as I turned away, the farmer said with a smile “Those are going to become your favorite green!!” To which I simply smiled and said ‘Thank you!’
She was 100% correct. I stripped the leaves that evening and sauteed them for dinner and with the first bite, I was raving over how tender and amazing they tasted and couldn’t wait to return the following week for more. Also known as Kamote, or Camote leaves, and as other dark leafy greens they are loaded with vitamins and minerals like iron, magnesium and calcium, making them a good choice for healthy eating. Each week I could, I returned to that market, and that farmer and scooped up large bunches of Sweet Potato leaves. While many cultures also eat the stems, I consumed only the leaves, tossing the stems in the garden to compost. Imagine my surprise when I noticed after a few weeks that those stems had taken root and were growing new leaves. I managed to get a small crop of my own Sweet Potato leaves from my garden before the first frost in September. Now that’s a nice bonus.
I’ve been on the fence with Eggplant for a while now, fighting back and forth with it, hoping to fall in love even when I fall on my face, but for some reason I keep trying and I’m really glad as I have discovered more ways this summer to enjoy Eggplant. I came across Rosa Bianca eggplants too, and was immediately drawn to their unique colors.

But I also came across a completely new (to me) eggplant; a tiny orange one with grooved sides that looked a lot like a mini pumpkin.

The farmer told me that they could be roasted like regular eggplant. What she didn’t tell me, and what I discovered a bit too late was that this little orange variety is very bitter and is considered a delicacy in SE Asian cuisine. One bite and I had to admit that I’d found a vegetable I couldn’t eat.
A few more unique vegetables crossed my doorstep this summer, due to a relationship with Ocean Mist Farms. I was contacted by a representative of Ocean Mist back in July and asked if I was interested in some fresh Fennel to try. While Fennel isn’t really anything new, it was not a vegetable I’d done much with and while I did like it, the cost had always been prohibitive. I agreed to the Fennel they would send, and soon a case of it arrived at my house, holding six large, aromatic and superbly fresh bulbs. We had a wonderful time enjoying the light anise flavor, roasting them with potatoes and carrots. Fennel becomes so nicely sweet when roasted. I also added fennel to a slaw salad I made, loving it’s crisp texture and added taste to a favorite summery dish.
Recently, Ocean Mist contacted me again, offering to send me a vegetable I’d never even heard of: Cardones. Curiosity won me over, and I accepted. I had no idea what I was going to receive.

Cardones, or Cardoons, are very popular in Italy, come from the Thistle family and are considered a distant cousin of the Artichoke. They look like mutant celery, but they cannot be eaten raw. The internal part of the plant has slim silvery gray leaves that look like sage. And they are HUGE. Check out those stalks!!!
This was nothing like I’d known before; and I was initially at a loss as to what to do. After some research online, I decided to make a creamy cardone soup out of one of the bunches. They require a long simmering time, and mixed with onion and leek, it offered a warm and fragrant scent to a chilly evening. The finished soup was smooth, mild and creamy, and as we discovered, tasted amazing with some leftover wild rice pilaf stirred in to it.
The next two stalks I roasted, and this method was the best tasting. I tossed the slices with a bit of olive oil and a splash of an asiago caesar salad dressing I had on hand and after a nice long turn in a 425° oven, they were tender and flavorful enough to toss with pasta. The experience with Cardones was really interesting; I kept expecting celery flavor, but instead got something so unusual. It was like artichokes but richer. Cardones are similar to Artichokes in that they will discolor when cut apart, and should be soaked in acidulated water to prevent brown spots from forming. I did discover too, that they will change color even after cooking, and the roasted pieces I had in the refrigerator turned a strange shade of greenish gray after a day. The taste does not change though, even when they look just a bit unappetizing. I’m sure they have a lot more use in the kitchen, and maybe I’ll come across them again so I can experiment more.
WHAT NEW VEGETABLES ARE YOU LEARNING ABOUT?
ARE THERE VEGETABLES YOU EAT NOW THAT YOU NEVER THOUGHT YOU WOULD LIKE?
DISCLAIMER:
Ocean Mist Farms provided me with both the case of Fennel and the Cardones free of charge.
I have no obligation to post any feedback or information on them, and all opinions are my own.
November 3rd, 2010
| 2 Comments »
I probably should let you in a on some information, lest you wonder why I’ve suddenly gotten a tad more verbose these days; I’m participating in National Blog Posting Month, or NaBloPoMo. Every November, bloggers are challenged to post daily to their sites, and I last jumped into this fray in 2008. My NaBloPoMo then had a theme; daily food holidays. It was fun, challenging and a wonderful learning experience as I gained knowledge of new foods and kitchen experiences through that exercise.

This year, I don’t have a theme, but I do have a desire to not bore you to death and I hope I succeed. So there will be photos, some stories, likely a sharing of ideas and things that inspire me and probably recipes, of course. Some will be new and some likely will be resurrected from my Archives. I’ve been writing this blog for 4-1/2 years and my recipe index is pretty huge. There’s a lot of gems in there, including this one for Curried Chickpeas.

Interestingly enough, when I went searching for some inspiration to help me out today, I spotted this photo and then went scanning for the actual recipe on my blog, only to find that I posted it exactly a year ago. Weird. But in a good way. This recipe is super-fast, and incredibly flavorful, with warming spices for the chilly November days ahead.
Curried Chickpeas
From The Los Angeles Times, 10/21/09
1 medium onion, diced
1 t. turmeric
1 t. coriander seed
1 t. cumin seed
1/2 t. cayenne pepper
2 15-oz cans chickpeas, drained and rinsed
2 T. chopped cilantro (more to taste)
1 T. each fresh squeezed lemon juice and zest (lime would work fine, in fact I think it might be better)
With a mortar and pestle, or a spice grinder, crush the coriander and cumin seed into coarse powder.
In a saute pan, heat oil of choice and add onions over medium-high heat. Saute onion until deep golden brown and crispy, about 8-10 minutes, stirring frequently. Add the turmeric, coriander, cumin and cayenne. Cook, stirring frequently until aromatic and toasted, about 2-3 minutes. Stir in the chickpeas, cilantro and lemon juice. Cook, stirring occasionally for about 10 minutes to allow the flavors to develop. Remove from heat and taste. Season with salt if desired. Allow to cool, transfer to a container and chill prior to serving. Adjust lemon juice and seasoning if you wish.
KATE’S NOTES:
I like the fresh flavors of using whole coriander and cumin seed in recipes. If you don’t keep a mortar and pestle, or spice grinder on hand, use pre-ground spices in the same quantity.
January 23rd, 2008
| 8 Comments »
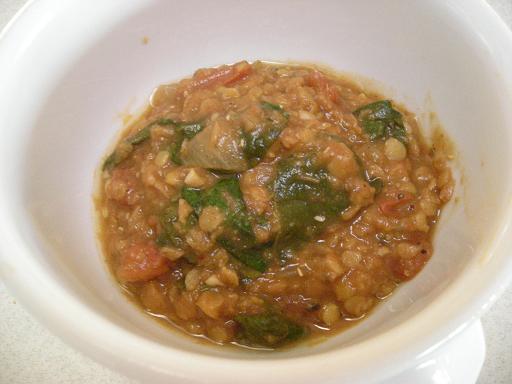
Red Lentil Dhal
makes 6-8 servings
Toasting and grinding your seeds is so worth the effort, and doesn’t take long at all. Serve this dhal as a main dish with rice or as a side dish. It is aromatic, rich and delicious.
Ingredients
3 tablespoons peanut oil
1 medium yellow onion
1 tablespoon fresh ginger, grated
4 garlic cloves, minced
1 teaspoon salt
1 cup dried red lentils
2 tablespoon tomato paste
4-5 cups water or veg broth
5 plum tomatoes, chopped
juice of 1 lime
1 cup lightly packed chopped fresh cilantro
Spice blend
2 teaspoon mustard seeds
1 teaspoon fenugreek seeds
1 teaspoon coriander seeds
1 teaspoon cumin seeds
6 whole cloves
4 cardomom pods
2 dried red chilis (seeds removed)
1/4 teaspoon ground cinnamon
Directions
In a saute pan over medium heat, toast the seeds (but not the dried red chili) for about 5 minutes, stirring frequently. Remove from pan and let cool. Transfer to coffee grinder, along with the dried red chili and cinnamon, and grind to a fine powder. Over medium-high heat oil a soup pot, add onions and saute for 5 minutes. Add garlic and ginger and saute 5 more minutes. Add spices and salt, saute 5 minutes more. Add 4 cups of water and stir to deglaze the pot. Add tomato paste and lentils. Bring to a boil then lower the heat a bit and simmer for 20 minutes. Add the tomatoes, lime juice and cilantro and more water if it looks too thick. Simmer 10 more minutes, or until lentils are completely tender.
RECIPE NOTES: Surprise! I didn’t vary too much from this original recipe except to add about two cups of shredded spinach to the last 10 minute simmer. I also grated in some lime zest simply because I love how it tastes. It needed no extra water after 30 minutes of simmering, and as it sat and cooled it thickened quite a bit, so if you get an end result that seems thin, don’t despair. After a night in the fridge it was thicker still.
I did cook the onions until they were slightly browned and rather soft; I love the flavor they impart with this amount of cooking. Beware when you add the water after cooking the spices and onion mixture- the pan will splatter a lot!
TOAST the spices!! TOAST the spices! TOAST the spices!
January 3rd, 2008
| 5 Comments »
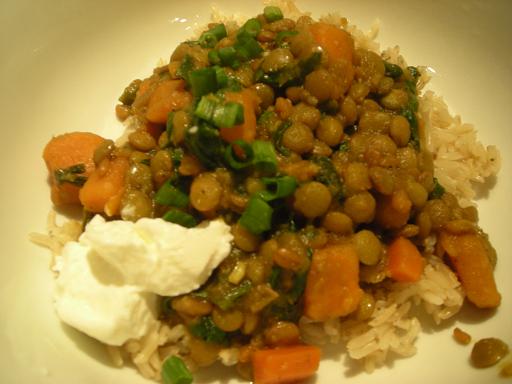
Curried Lentils With Sweet Potatoes and Swiss Chard
Yield: 8 to 10 side-dish servings; 6 main-course servings.
2 tablespoons extra virgin olive oil
1 medium onion, chopped
4 garlic cloves, minced
1 1-inch piece fresh ginger root, peeled and grated
1 1/2 teaspoons garam masala
1 1/2 teaspoons curry powder
1 jalapeño pepper, seeded if desired, then minced
4 to 5 cups vegetable broth as needed
2 pounds orange-fleshed sweet potatoes, peeled and cut into
1/2-inch cubes (about 4 cups)
1 1/2 cups dried lentils
1 bay leaf
1 pound Swiss chard, center ribs removed, leaves thinly sliced
1 teaspoon kosher salt, more to taste
1/2 teaspoon ground black pepper
1/3 cup chopped fresh cilantro
Finely grated zest of 1 lime
Juice of 1/2 lime
1/3 cup finely chopped tamari almonds, for garnish (optional), available in health food stores
1/4 cup chopped scallions, for garnish.
1. In large saucepan, heat oil over medium heat. Add onion and sauté until translucent, 5 to 7 minutes. Add garlic, ginger, garam masala, curry powder and jalapeño. Cook, stirring, for 1 minute.
2. Stir in 4 cups broth, sweet potatoes, lentils and bay leaf. Increase heat to high and bring to a boil; reduce heat to medium, partially cover, and simmer for 25 minutes. (If lentils seem dry, add up to 1 cup stock, as needed.) Stir in chard and salt and pepper, and continue cooking until lentils are tender and chard is cooked, about 30 to 45 minutes total.
3. Just before serving, stir in cilantro, lime zest and juice. Spoon into a large, shallow serving dish. Garnish with almonds if desired and scallions.
RECIPE NOTES: I am not a fan of swiss chard, so I used spinach instead. I added several diced carrots to the dish as well as the potato and that was delicious. At the end of the cooking time I dumped in a cup of cooked wheat berries (i keep them in the freezer). It adds more nutritional value to the dish and a nice nutty and chewy texture.
I cooked this for at least an hour and I think it could have cooked much more as the lentils still seemed a tad chewy. It’s hard to determine how much time is needed, but the potato was getting mushy and I didn’t want to cook it too much longer for fear they would fall apart. The spinach, if used, can be stirred in just a few minutes prior to serving; it won’t need much to make it wilt. It can be eaten alone, no doubt; we love the rice; so for us that was perfect. We did not top it with almonds.
|


